

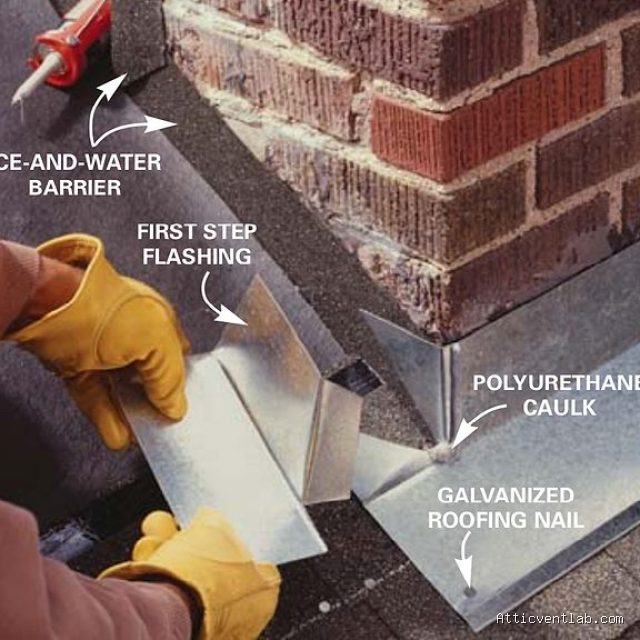
Atticventlab.com – Silicone fails on chimney flashing corners due to the mismatch between the sealant’s rigid curing process and the extreme, repetitive thermal expansion and contraction cycles of metal flashing against masonry. This constant mechanical stress leads to adhesive bond failure, causing the sealant to pull away from the substrate and creating pathways for water infiltration.
The Mechanics of Thermal Shock at Chimney Corners
Chimney flashing is one of the most vulnerable points on a roof. It acts as a bridge between the rigid, static masonry of the chimney and the dynamic, expanding roof deck. When sunlight hits a metal flashing corner, the metal heats up rapidly and expands. Conversely, during a cold rain shower or at night, it cools down and contracts. This phenomenon is known as thermal shock.
Silicone, while often touted for its flexibility, has a specific threshold for movement capability. When applied to a corner—which is a stress concentration point—the sealant is subjected to multi-directional forces. If the bead is too thick or improperly tooled, it cannot stretch enough to accommodate the shear stress caused by the metal pulling in two different directions at once. Over time, the internal structure of the silicone fatigues, resulting in microscopic tears that eventually propagate into full-scale gaps.
Why Standard Silicone Often Underperforms
Many DIYers and inexperienced contractors default to standard acetoxy-cure silicone because it is readily available at hardware stores. However, these formulations are often designed for glass or smooth metal surfaces, not for the high-movement, high-temperature environment of a chimney. Furthermore, standard silicone often struggles with “adhesion-in-peel” on porous masonry surfaces.
When silicone is applied to a chimney, it must bond to both the brick or mortar and the metal flashing. Masonry is porous and often dusty. If the surface is not primed correctly, the silicone forms a surface-level bond that is easily broken by the physical movement of the metal. Once the bond at the masonry interface fails, the corner becomes a funnel for water, which then freezes in the winter, causing further structural damage to the chimney stack.
Comparison of Flashing Sealants
Read also: How to Fasten Metal Rake Trim Without Warping the Face Profile Panel
| Sealant Type | Thermal Movement Capacity | Adhesion to Masonry | Longevity on Corners |
|---|---|---|---|
| Standard Silicone | Low to Moderate | Poor (without primer) | Short-term |
| Polyurethane | High | Excellent | Long-term |
| Modified Polymer (STPE) | Very High | Excellent | Superior |
The Role of Geometry and Application Errors
The shape of the sealant bead is just as important as the material used. A common mistake is applying a triangular “fillet” bead that is too wide. A wide, flat bead limits the sealant’s ability to stretch because the center of the bead is pinned down. This creates a “stiffness effect” that concentrates all the thermal stress on the thin edges, leading to premature splitting.
Another critical error is failing to account for the “three-sided adhesion” problem. If the sealant is stuck to the back of the corner, the base of the corner, and the top of the corner simultaneously, it cannot move. It essentially becomes a rigid block. Professional installers often use a bond-breaker tape to ensure the sealant only adheres to the two faces that need to move, allowing the bead to stretch freely like a rubber band.
Steps to Properly Seal Chimney Flashing Corners
- Clean the area thoroughly using a wire brush to remove all loose mortar, old sealant, and organic debris.
- Wipe the metal and masonry surfaces with a solvent like xylene or denatured alcohol to ensure a grease-free substrate.
- Apply a bond-breaker tape or backer rod into the deepest part of the corner to prevent three-sided adhesion.
- Install a high-modulus, UV-stable polyurethane or silane-terminated polyether (STPE) sealant rather than standard silicone.
- Tool the sealant into a concave shape using a spatula, ensuring firm contact with both the metal and masonry edges.
- Allow the sealant to cure fully according to the manufacturer’s instructions before exposing it to heavy rain or extreme temperature swings.
Risks of Neglected Flashing Failures
When a corner seal fails, the damage is rarely localized. Water entering the gap travels behind the flashing and saturates the roof deck and the chimney masonry. In the summer, this trapped moisture can cause mold growth within the attic space. In the winter, the water freezes inside the masonry joints, causing “spalling,” where the face of the brick pops off due to the expansion of ice.
This is often referred to as the “leaking chimney syndrome.” Because the flashing is hidden under counter-flashing, homeowners often do not see the failure until interior water stains appear on the ceiling. By the time the stain is visible, the wood framing around the chimney may have already begun to rot, turning a simple maintenance task into a major structural repair.
Q: Is silicone ever appropriate for chimney flashing?
A: Only high-performance, neutral-cure silicone specifically rated for extreme movement and masonry adhesion should be considered, but modern polyurethanes or hybrid polymers generally offer better long-term reliability for high-stress corners.
Q: Why does my sealant look like it is pulling away from the brick?
A: This is usually caused by inadequate surface preparation or the lack of a primer on porous masonry, which prevents a deep chemical bond from forming, allowing the sealant to peel away during thermal expansion.
Q: Can I just layer more silicone over the old, cracked silicone?
A: No, applying new sealant over old, failed material is a major mistake. The new sealant will only adhere to the loose, failing layer, and the repair will fail again within months; all old material must be stripped away first.
Ultimately, the failure of silicone at chimney corners is a lesson in material science. By understanding that the chimney and the roof are two different structures moving at different rates, homeowners can move away from “quick fix” sealants and toward systems that are engineered to survive the harsh reality of thermal shock.
📷 Photo by familyhandyman.com








1 Comments
[…] Read AlsoWhy Silicone Fails on Chimney Flashing Corners Subject to Thermal Shock […]