

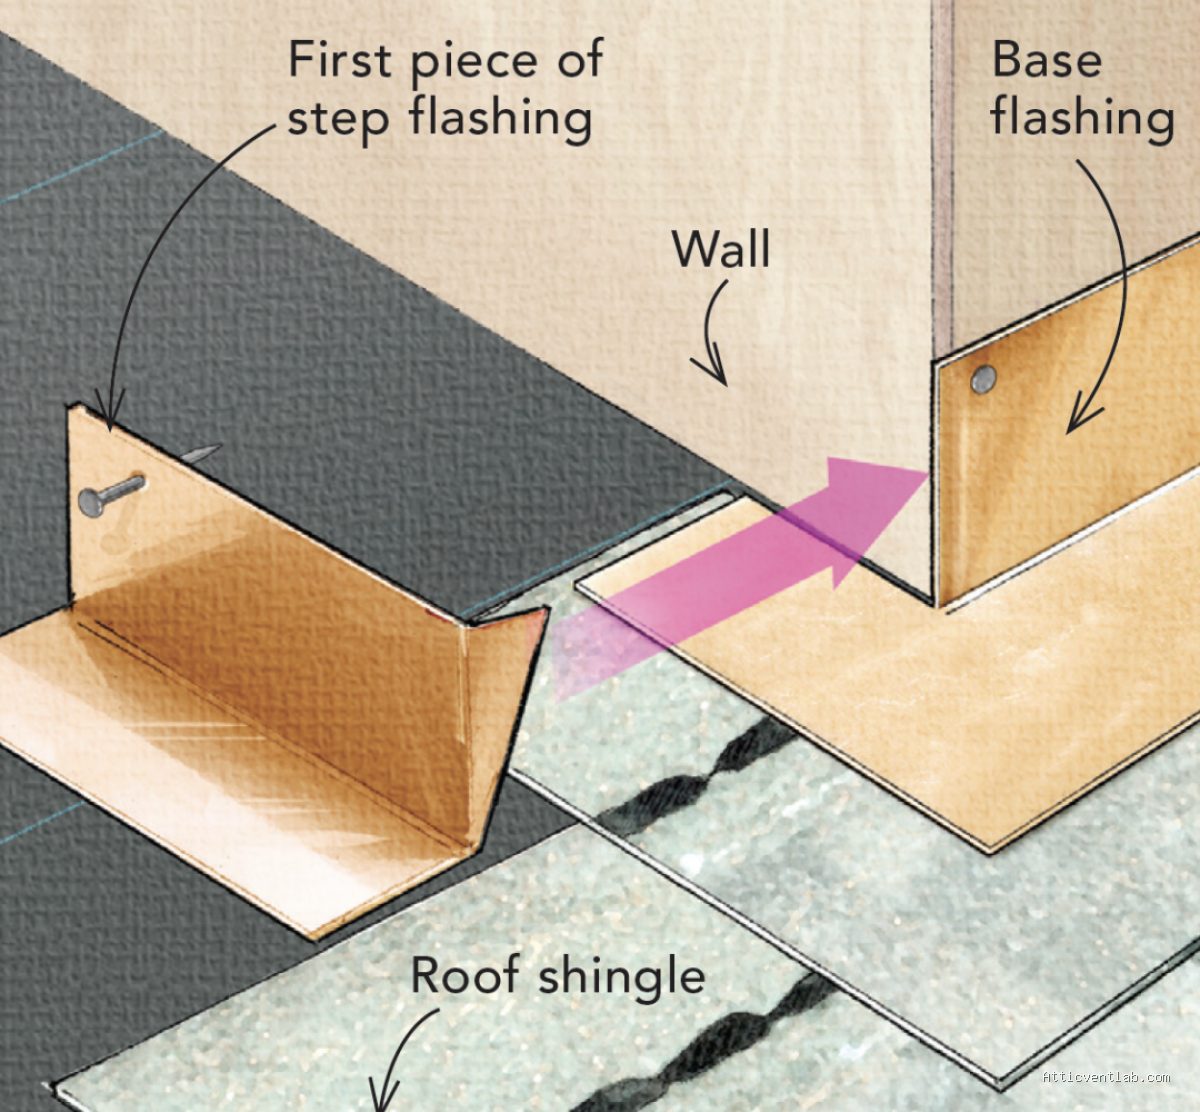
Atticventlab.com – Sealing the gap between step flashing and wood siding lap corners requires a combination of high-quality exterior-grade sealant and professional-grade flashing tape to prevent water infiltration that leads to rot. Proper integration of these materials ensures a watertight transition where vertical wall surfaces meet the sloped roof plane.
Understanding the Vulnerability of Lap Corners
The junction where step flashing meets wood siding is a notorious entry point for moisture. Wood siding, particularly lap siding, creates irregular gaps as boards overlap and expand or contract with temperature changes. When step flashing is installed behind these boards, the “kick-out” area or the corner joint often remains exposed to wind-driven rain. If these gaps are not addressed, water can bypass the flashing, seep behind the siding, and eventually damage the structural sheathing and wall studs.
Homeowners often mistake this for a roofing issue, but it is fundamentally a wall-to-roof transition failure. Over time, wood siding may warp or pull away from the flashing, widening these gaps and making the home susceptible to wood rot, mold growth, and interior water stains. Addressing this requires a systematic approach that respects the movement of the building materials while maintaining a continuous barrier against the elements.
Choosing the Right Materials for the Job
Not all sealants are created equal. You must use a product specifically designed for exterior use that remains flexible throughout extreme seasonal shifts. Silicone-based sealants are generally superior for this application because they adhere well to both metal flashing and wood, and they do not become brittle when exposed to UV radiation.
Comparison of Common Sealing Materials
| Material Type | Best Use Case | Durability | Flexibility |
|---|---|---|---|
| Polyurethane Sealant | General gaps, paintable surfaces | High | Moderate |
| Silicone Sealant | Metal-to-wood joints, high UV areas | Very High | Excellent |
| Butyyl Flashing Tape | Bridging larger gaps before sealing | High | High |
| Acrylic Latex Caulk | Minor interior/protected gaps | Low | Low |
Step-by-Step Sealing Process
Following a methodical process is essential to ensure that you are not trapping moisture behind the siding. If you seal the top and sides but accidentally seal the bottom in a way that prevents drainage, you may cause more harm than good.
- Clean the area thoroughly by removing dirt, loose paint, and old, crumbling caulk using a stiff wire brush or a putty knife.
- Ensure the surface is completely dry, as moisture trapped during the sealing process will prevent proper adhesion and lead to premature failure.
- Apply a high-quality, exterior-grade flashing tape over the transition point if the gap is larger than 1/4 inch, ensuring it adheres firmly to both the metal step flashing and the wood siding.
- Apply a consistent bead of silicone sealant along the edges of the flashing where it meets the wood siding, using a caulk gun to maintain steady pressure.
- Tool the sealant with a gloved finger or a smoothing tool to push the material into the gap and create a clean, sloped profile that sheds water away from the siding.
- Allow the sealant to cure fully according to the manufacturer’s instructions before applying any touch-up paint or exterior finish.
Common Mistakes to Avoid
One of the most frequent errors is “over-sealing” the bottom edge of the step flashing. Step flashing is designed to allow water to run down the roof and over the next piece of flashing. If you seal the bottom edge where the metal meets the roof, you trap water behind the flashing, forcing it into the wall. Always leave the bottom edge of the flashing open to ensure that any moisture that finds its way behind the siding has a clear path to exit onto the roof surface.
Another common mistake is applying sealant over dirty or wet surfaces. If the siding has peeling paint or accumulated moss, the sealant will bond to the debris rather than the wood, leading to a failure within a single season. Always take the time to prime the wood if it is bare, as bare wood can absorb the oils from some sealants, causing them to lose their grip.
Maintaining the Seal Over Time
External building components are subject to constant thermal expansion and contraction. Even the best sealant will eventually degrade after five to seven years. It is recommended to perform a visual inspection of these corners every spring after the winter freeze-thaw cycle has ended. Look for signs of cracking, peeling, or gaps that have opened up due to the wood siding moving. Early detection of a failing seal is significantly cheaper than repairing the structural rot caused by long-term water exposure.
Frequently Asked Questions
Q: Can I use standard interior caulk for these exterior gaps?
A: No, interior caulk is not designed to handle the extreme temperature fluctuations and UV exposure found outdoors. It will crack and fail rapidly, often within a few months.
Q: Should I paint over the sealant once it is cured?
A: If you use a paintable polyurethane caulk, you can paint over it once it is fully cured to match the siding color. However, many high-performance silicone sealants are not paintable, so check the product label before application.
Q: Is it necessary to remove the old caulk before applying new sealant?
A: Yes, applying new sealant over old, failing caulk is a recipe for failure. The new material will only be as strong as the old material it is bonded to, which is likely already compromised.
By focusing on proper surface preparation and selecting the correct grade of sealant, you can effectively bridge the gap between step flashing and wood siding. This simple maintenance task serves as a critical defense layer, protecting your home from the silent damage of water intrusion and extending the life of your siding and roof deck.
📷 Photo by finehomebuilding.com








Leave a Reply