

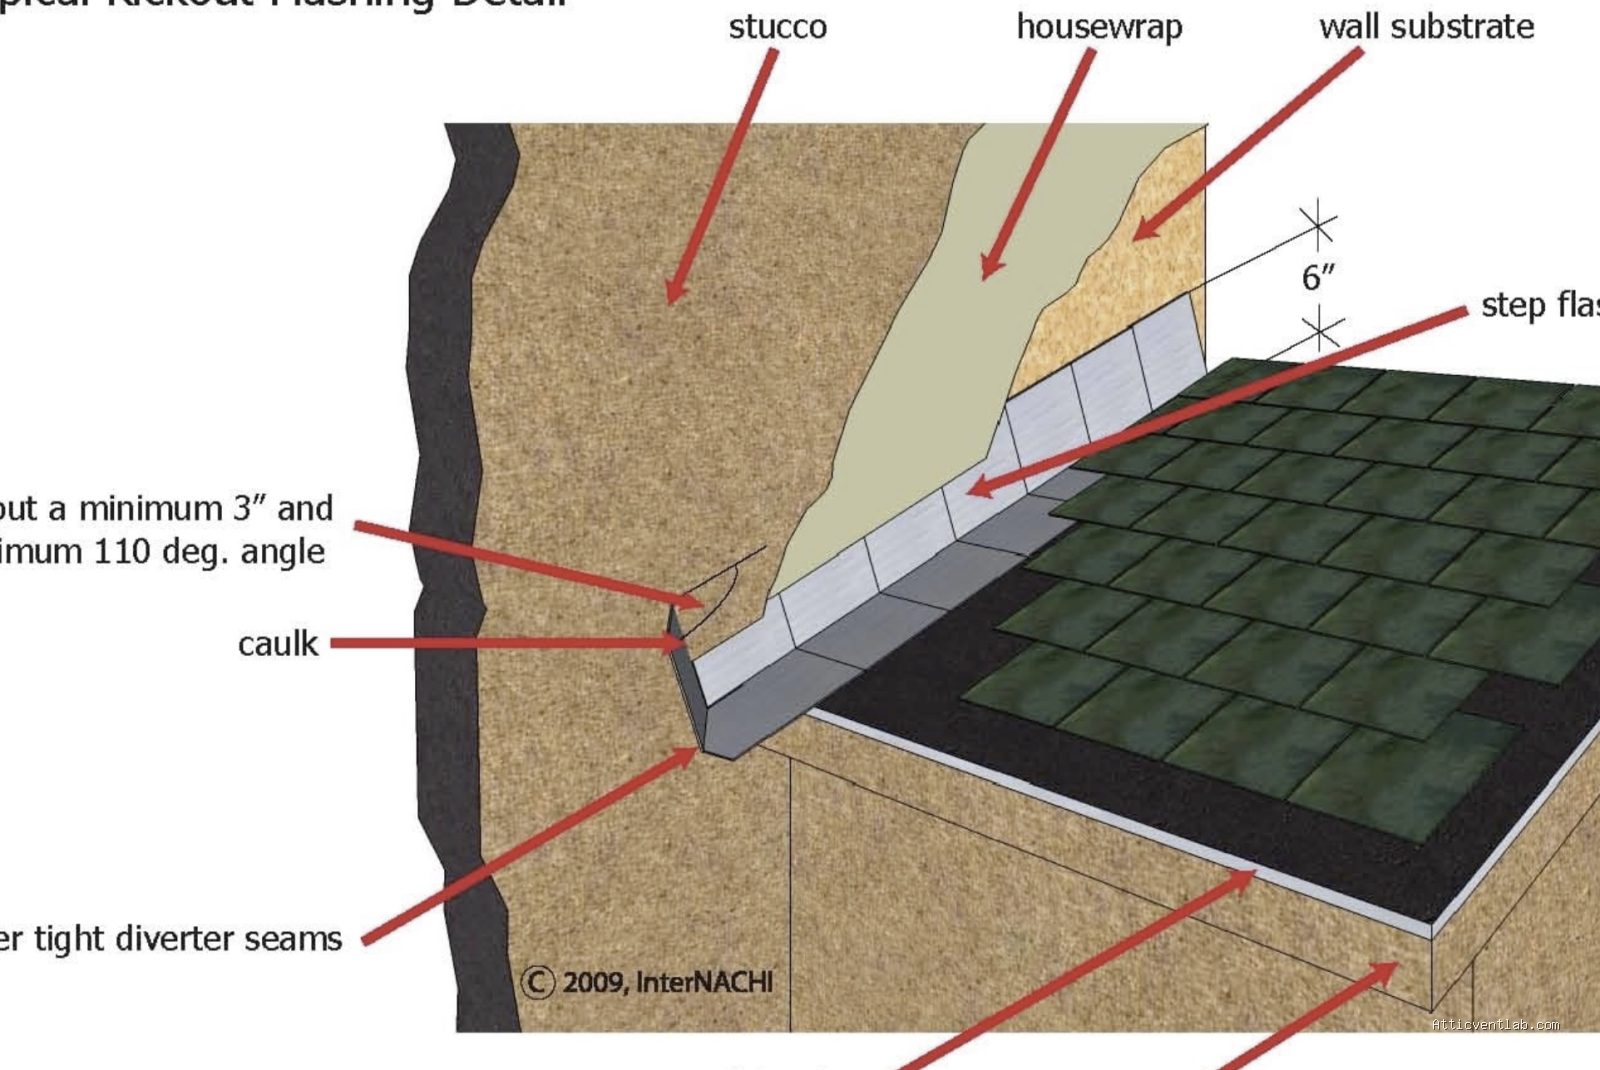
Atticventlab.com – A kickout flashing diverter is a specialized piece of flashing installed at the eave where a roof slope meets a vertical wall to direct rainwater away from the siding and into the gutter, effectively preventing structural wall rot and water damage.
Water intrusion is the silent killer of residential structures. When a roofline terminates into a wall, the standard flashing often fails to manage the volume of water sheeting down the roof surface. Instead of flowing into the gutter, this water is frequently directed behind the siding or into the wall cavity. Over time, this leads to significant wood rot, mold growth, and expensive framing repairs. Installing a kickout flashing—also known as a diverter—is the most reliable engineering solution to force this water away from the wall plane.
Understanding the Mechanism of Water Damage
The primary reason for wall rot in these specific areas is the concentration of runoff. A roof pitch acts as a funnel; if the roof is large, the volume of water hitting the intersection of the roof and wall is substantial. Standard step flashing is designed to protect the joint, but it does not account for the final “kickout” required to move water into the gutter system. Without a diverter, water travels along the step flashing and inevitably drips behind the siding, soaking the house wrap and the sheathing.
Signs that you need a kickout diverter include peeling paint at the bottom of the wall, soft wood near the roof-to-wall intersection, or dark staining on the exterior cladding. If you notice these symptoms, the damage may have already penetrated the sheathing. Ignoring these signs can lead to the deterioration of the wall studs and bottom plate, which are critical for the structural integrity of your home.
Tools and Materials Required
Before beginning the installation, ensure you have the proper materials. Most kickout flashings are made of aluminum, copper, or galvanized steel. It is essential to match the material of your existing step flashing to prevent galvanic corrosion. You will also need high-quality exterior-grade sealant, a pry bar, a utility knife, and a circular saw or metal snips depending on your siding material.
| Component | Purpose |
|---|---|
| Kickout Flashing | The primary diverter to push water into the gutter. |
| Step Flashing | Individual metal pieces that run up the roof-wall intersection. |
| Polyurethane Sealant | Creates a watertight bond between flashing and siding. |
| House Wrap Tape | Ensures the moisture barrier remains intact during installation. |
Step-by-Step Installation Guide
Installing a kickout diverter requires precision to ensure the water is actually diverted rather than trapped. Follow these steps to ensure a professional-grade installation:
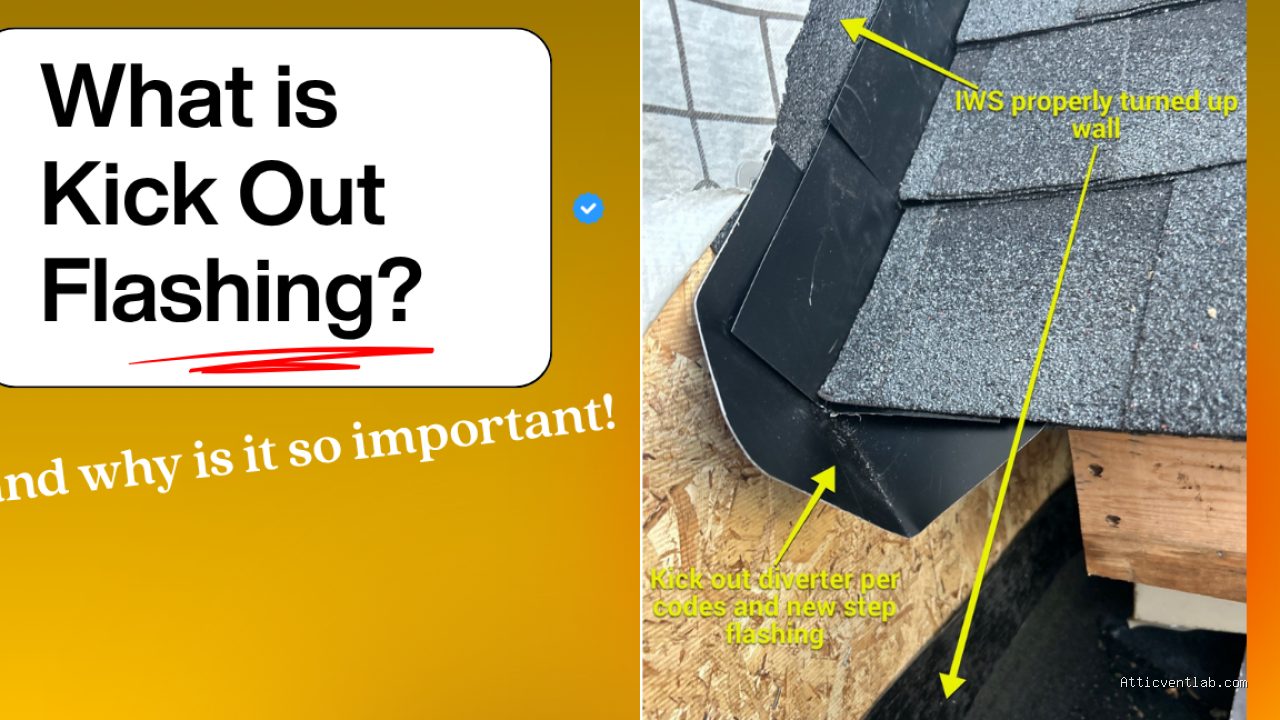
📷 Photo by roofingbymidsouth.com
- Carefully remove the siding near the bottom of the roof-to-wall intersection. You typically need to expose about 12 to 18 inches of the wall area to ensure you can properly integrate the flashing with the existing house wrap.
- Check the condition of the underlying sheathing. If it is soft or rotted, replace the section of wood before proceeding, as flashing cannot fix existing structural decay.
- Install the kickout flashing at the very base where the roof meets the gutter. The diverter should be bent so that it extends at least one inch past the face of the siding, ensuring the water falls directly into the gutter.
- Apply a bead of high-quality polyurethane sealant along the back flange of the kickout flashing before fastening it to the wall studs.
- Overlap the new kickout flashing with the existing step flashing. The step flashing must be tucked under the house wrap, and the kickout must be placed on top of the step flashing to maintain a shingle-lap flow of water.
- Reinstall the siding, ensuring that the bottom edge of the siding does not touch the roof shingles directly. Maintain a gap of at least two inches to prevent “wicking,” where water climbs up the siding via capillary action.
- Seal the edges of the siding where they meet the diverter using a paintable exterior sealant, but leave the bottom edge open to allow any incidental moisture to escape.
Common Mistakes to Avoid
One of the most frequent errors is failing to integrate the flashing with the house wrap. If the flashing is installed on top of the siding rather than behind the house wrap or water-resistive barrier, water will simply find a new path behind the flashing and into the wall. Always ensure the “shingle effect” is respected: the material higher up the wall must always overlap the material below it.
Another common mistake is using silicone caulk that cannot be painted or that degrades under UV light. Always use a professional-grade elastomeric sealant that is specifically rated for exterior wall assemblies. Additionally, avoid using nails that penetrate the roof surface unnecessarily; if you must nail, ensure the fastener head is covered by the next piece of flashing or sealed with a dab of roofing cement.
Maintenance and Long-Term Protection
Once installed, a kickout diverter requires very little maintenance. However, you should inspect the area annually. Check to see if the diverter has been bumped or bent by falling branches or gutter cleaning efforts. Ensure that the gutter directly below the diverter is free of debris, as a clogged gutter will cause water to back up and defeat the purpose of the diverter.
If you live in a region with heavy snowfall, ensure that ice dams are not forming in the gutter. Ice dams can force water back up under the roof shingles and behind the flashing, regardless of how well the kickout is installed. Proper attic insulation and ventilation are essential partners to your flashing system, as they help regulate roof surface temperatures and prevent the melting and refreezing cycles that lead to ice dams.
Q: Can I install a kickout flashing if I have vinyl siding?
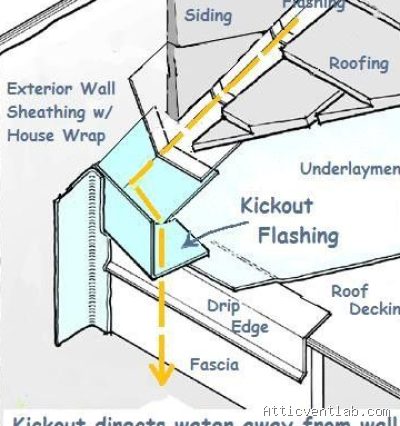
📷 Photo by in.pinterest.com
A: Yes, but it requires more careful work. You will need to detach the bottom courses of the vinyl siding, install the flashing, and then carefully snap the siding back into place, ensuring it is not pulled too tight against the diverter.
Q: Is it necessary to use a professional for this installation?
A: While a DIY enthusiast can perform this task, it requires knowledge of building science and water shedding principles. If you are uncomfortable with roof work or siding removal, hiring a professional roofer or exterior contractor is recommended to avoid creating new leaks.
Q: What is the best material for a kickout diverter?
A: Aluminum or copper are preferred. Aluminum is cost-effective and easy to bend, while copper is highly durable and aesthetically pleasing, especially on historic homes, though it must be used with compatible fasteners to avoid corrosion.
📷 Photo by nachi.org








Leave a Reply