

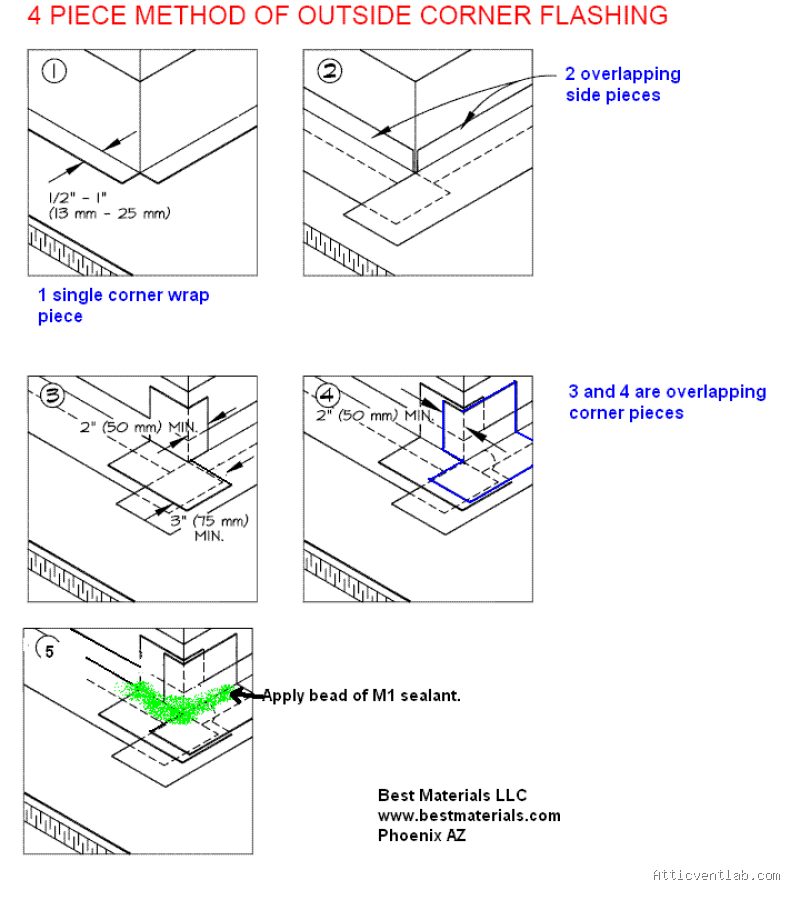
Atticventlab.com – Fixing a leaking dormer corner requires ensuring the step flashing is properly integrated beneath the siding and correctly overlapped by a properly installed kickout flashing that diverts water away from the wall and onto the roof surface.
Water intrusion at the intersection of a dormer and a roof slope is one of the most common points of failure in residential roofing. This specific junction is highly vulnerable because it acts as a funnel for rainwater running down the dormer wall. If the transition between the vertical step flashing and the horizontal kickout flashing is poorly sealed or incorrectly layered, water will inevitably bypass the barrier and rot the wooden structural framing hidden underneath.
Identifying the Root Cause of the Leak
Most leaks in this area are not caused by a single hole in the shingle but by a failure in the flashing sequence. The primary culprit is often “reverse lapping,” where the upper layer of flashing sits behind the lower layer, allowing water to flow directly into the wall cavity. Another frequent cause is the absence of a true kickout flashing, which forces water to run vertically down the wall siding instead of being redirected onto the shingles below.
You may notice signs of this issue long before you see a drip inside the attic. Look for peeling interior paint near the dormer corner, dark water stains on the rafters, or the smell of mildew in the attic space. Externally, check for siding that appears warped or soft, as this indicates that moisture has been trapped behind the exterior finish for an extended period.
Essential Tools and Materials
Before beginning the repair, ensure you have the correct materials. Using the wrong gauge of metal or incompatible fasteners can lead to galvanic corrosion or premature failure. Below is a summary of the essential components required for a watertight seal.
| Component | Purpose | Recommended Material |
|---|---|---|
| Step Flashing | Protects the vertical wall-to-roof transition | Pre-bent aluminum or galvanized steel |
| Kickout Flashing | Diverts water away from the wall | Custom-bent or pre-manufactured metal |
| Roofing Cement | Temporary sealant for edges | Polyurethane-based flashing sealant |
| Underlayment | Secondary water barrier | Self-adhering ice and water shield |
Step-by-Step Repair Guide
Repairing this area requires precision. You must remove the existing siding and shingles carefully to expose the underlying wood to ensure the structural integrity of the corner is intact before applying new flashing.
- Carefully remove the siding boards near the corner of the dormer to expose the flashing and the wall sheathing.
- Remove the damaged or incorrectly installed step flashing pieces, ensuring you do not damage the underlying roof deck.
- Inspect the wooden framing for signs of rot; if the wood is soft, it must be replaced before proceeding to prevent structural collapse.
- Install a piece of self-adhering ice and water shield membrane over the corner, ensuring it extends at least six inches up the wall and six inches onto the roof.
- Install the new step flashing, ensuring each piece overlaps the one below it by at least two inches.
- Install the kickout flashing at the bottom of the transition, making sure the “kickout” portion extends outward to push water away from the wall and onto the roof shingles.
- Replace the siding, leaving a small gap (approximately 1/4 to 1/2 inch) between the bottom of the siding and the roof surface to prevent “wicking” of water into the siding material.
Common Mistakes to Avoid
One of the most frequent errors is applying excessive amounts of caulk in an attempt to stop a leak. Caulking is a secondary measure and should never be the primary defense against water. When you rely solely on caulk, you create a dam that traps water behind the flashing, accelerating the deterioration of the wood. Over time, the sun will cause the caulk to crack, creating a pathway for water that is even more difficult to diagnose.
Another mistake is failing to extend the kickout flashing far enough. If the kickout does not extend past the edge of the roof or the gutter line, it serves no purpose. The goal is to ensure that the water volume is physically separated from the wall surface entirely. If your dormer has stucco or masonry siding, the difficulty increases significantly, as you may need to cut a reglet into the wall to properly tuck the flashing behind the weather-resistant barrier.
Maintenance and Long-Term Prevention
Even a perfectly installed flashing system requires periodic inspection. Debris such as leaves, pine needles, and dirt tend to accumulate in the corner where the dormer meets the roof. This debris acts like a sponge, holding moisture against the flashing and siding long after the rain has stopped. By keeping this corner clear of debris, you extend the life of your roofing materials and prevent the moisture buildup that leads to expensive structural repairs.
If you live in an area with heavy snowfall, consider installing a diverter or ensuring that your ice and water shield is applied higher up the wall. Snow dams can push water upward, bypassing standard flashing heights. A high-quality installation, combined with regular roof inspections, will protect your home from one of the most destructive types of water damage.
Frequently Asked Questions
Q: Can I just use heavy-duty roofing tape instead of replacing the flashing?
A: No. Roofing tape is a temporary solution and will not survive the thermal expansion and contraction of the roof over several seasons. It will eventually peel and trap water, leading to more severe rot.
Q: Why does the siding need to be held above the roof?
A: Siding that touches the roof surface acts as a wick, absorbing moisture through capillary action. Keeping a small gap allows air circulation and prevents water from being pulled up into the wall structure.
Q: How do I know if the wood framing is rotted?
A: Use a screwdriver to probe the wood. If it feels soft, spongy, or allows the screwdriver to sink in easily, the wood is compromised and must be replaced to provide a solid surface for the new flashing.
📷 Photo by storage.googleapis.com








Leave a Reply