

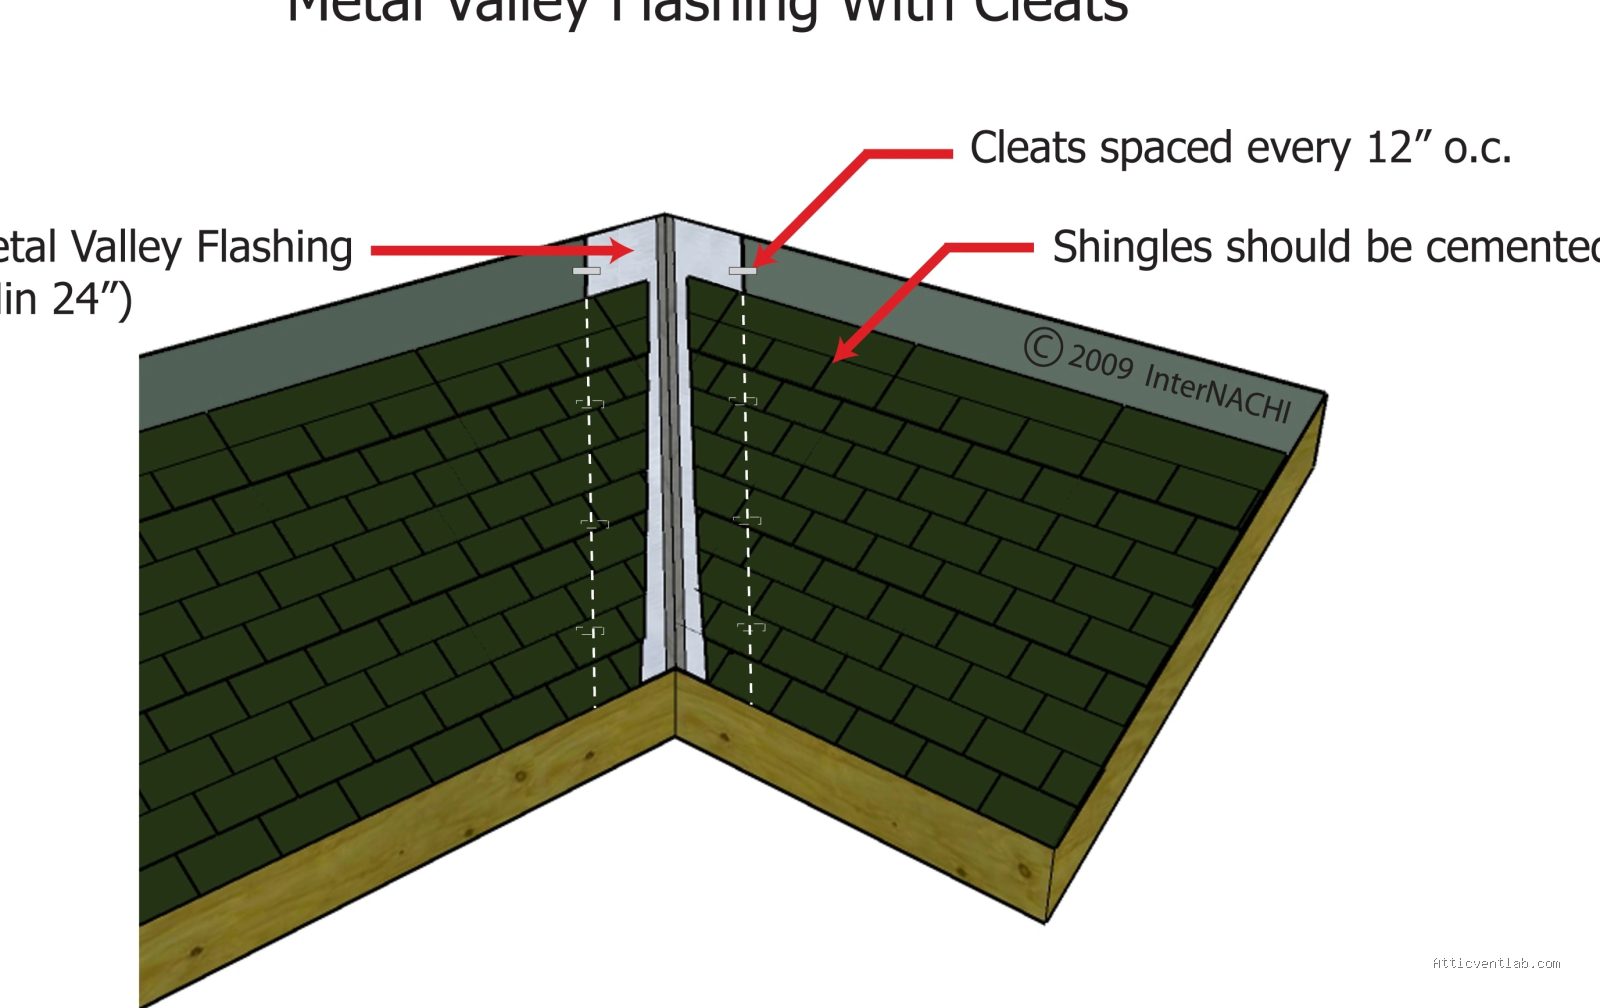
Atticventlab.com – Sealing valley flashing transitions on low-slope shed roof additions requires installing high-quality self-adhering membrane underlayment beneath the metal flashing and applying high-grade polyurethane sealant at all overlaps to prevent water backup and capillary action. Proper integration with the existing roof shingles and ensuring a smooth, debris-free flow path are the most critical steps to avoid long-term water intrusion.
Understanding the Challenge of Low-Slope Valleys
When you attach a shed roof addition to an existing structure, the valley where the two roof planes meet becomes a high-risk zone for leaks. Because the slope is low, water does not shed as quickly as it would on a steep pitch. This creates a risk of standing water, ice damming, and wind-driven rain being forced underneath the flashing. Traditional shingle-over-valley techniques often fail in these low-slope applications because they cannot handle the volume of water concentrated in the transition area.
The primary cause of failure in these transitions is improper overlap sequencing. If the metal flashing is not tucked far enough under the existing shingles or if the sealant bead is interrupted, water will bypass the flashing and penetrate the roof deck. Over time, this leads to structural rot, mold growth in the attic space, and damage to the interior ceiling of your shed addition.
Essential Materials for a Watertight Seal
To successfully seal a valley, you must move beyond standard roofing cement. You need materials that remain flexible during temperature fluctuations and possess high adhesive strength. Below is a breakdown of the materials required for a professional-grade installation.
| Material | Function | Recommended Type |
|---|---|---|
| Self-Adhering Underlayment | Secondary water barrier | Rubberized Asphalt (Ice & Water Shield) |
| Valley Flashing | Primary water channel | 26-gauge galvanized steel or aluminum |
| Sealant | Bonding and gap filling | Polyurethane-based roofing sealant |
| Fasteners | Mechanical attachment | Gasketed roofing screws or ring-shank nails |
Step-by-Step Installation Guide
Follow these steps to ensure the valley transition is fully protected against the elements. Precision at each stage is more important than speed.
Read also: Causes of Air Leaks Along Drop Ceilings and Chase Openings in the Attic
- Clear the area of all debris and existing shingles in the valley transition zone until the roof deck is exposed.
- Install a layer of self-adhering rubberized asphalt underlayment (ice and water shield) extending at least 24 inches up both sides of the valley. Ensure this membrane is centered perfectly in the trough.
- Apply a thick bead of polyurethane sealant along the edges where the existing roof shingles meet the valley area.
- Position your metal valley flashing over the underlayment, ensuring it is centered. If you are joining two pieces of flashing, overlap them by at least 12 inches, applying a generous amount of sealant between the layers.
- Secure the flashing using fasteners placed only at the very outer edges, keeping the center of the valley free of nail holes.
- Install your new shed roof shingles, trimming them to leave a clear channel for water flow. Ensure the shingles overlap the metal flashing by at least 6 inches.
- Apply a final bead of sealant under the edge of the shingles where they meet the metal flashing to prevent wind-blown debris and rain from lifting the shingle corners.
Common Mistakes and How to Avoid Them
One of the most frequent errors is “nailing the center.” Never drive a nail through the middle of the valley flashing. Even if you cover the nail head with sealant, the nail will eventually work loose due to thermal expansion, creating a direct path for water into your roof deck. Always nail through the outer edges of the metal flashing, specifically in areas that will be covered by the overlapping shingles.
Another common mistake is neglecting the “headwall” transition. Where the valley meets the vertical wall of the existing structure, water often hits a dead end. You must install a “kick-out” flashing or a custom-bent diverter to direct water away from the wall and into the center of the valley channel. Without this, water will inevitably track behind the siding of the existing house.
Maintenance and Inspection Tips
Even a perfectly installed valley requires periodic inspection, especially on low-slope roofs where leaves and pine needles tend to accumulate. Debris creates dams that trap water, forcing it to sit against the flashing and eventually find a way under the shingles. Schedule a cleaning at least twice a year, particularly after the autumn leaf-drop season.
Look for signs of distress such as curling shingles at the valley edges, cracked sealant, or rust spots on the metal flashing. If you notice any of these signs, address them immediately. A small repair involving a fresh bead of sealant is significantly cheaper than replacing a water-damaged roof deck or dealing with interior wall repairs.
Frequently Asked Questions
Q: Can I use standard asphalt roofing cement for the valley transition?
A: No. Asphalt-based cements become brittle in cold weather and may melt or run in extreme heat. Polyurethane sealants remain flexible and maintain a superior bond to both metal and asphalt shingles, making them the industry standard for this application.
Q: How wide should my metal valley flashing be?
A: For most residential shed roof additions, a 20-inch to 24-inch wide roll of metal flashing is sufficient. This provides enough width to extend well under the shingles on both sides, ensuring that even during heavy rain, water remains contained within the metal channel.
Q: Is it necessary to use a metal valley, or can I use a woven shingle valley?
A: On low-slope roofs, metal valleys are highly recommended over woven or closed-cut valleys. Metal provides a smoother, more reliable surface for water to exit rapidly, reducing the time water spends sitting on the roof surface, which minimizes the chance of leaks.
By adhering to these professional installation standards, you significantly increase the lifespan of your roof addition. The combination of high-quality underlayment, proper metal overlap, and the correct choice of sealant ensures that your transition will remain dry regardless of the weather conditions.
📷 Photo by nachi.org








1 Comments
[…] Read also: How to Seal Valley Flashing Transitions onto Low Slope Shed Roof Additions […]