

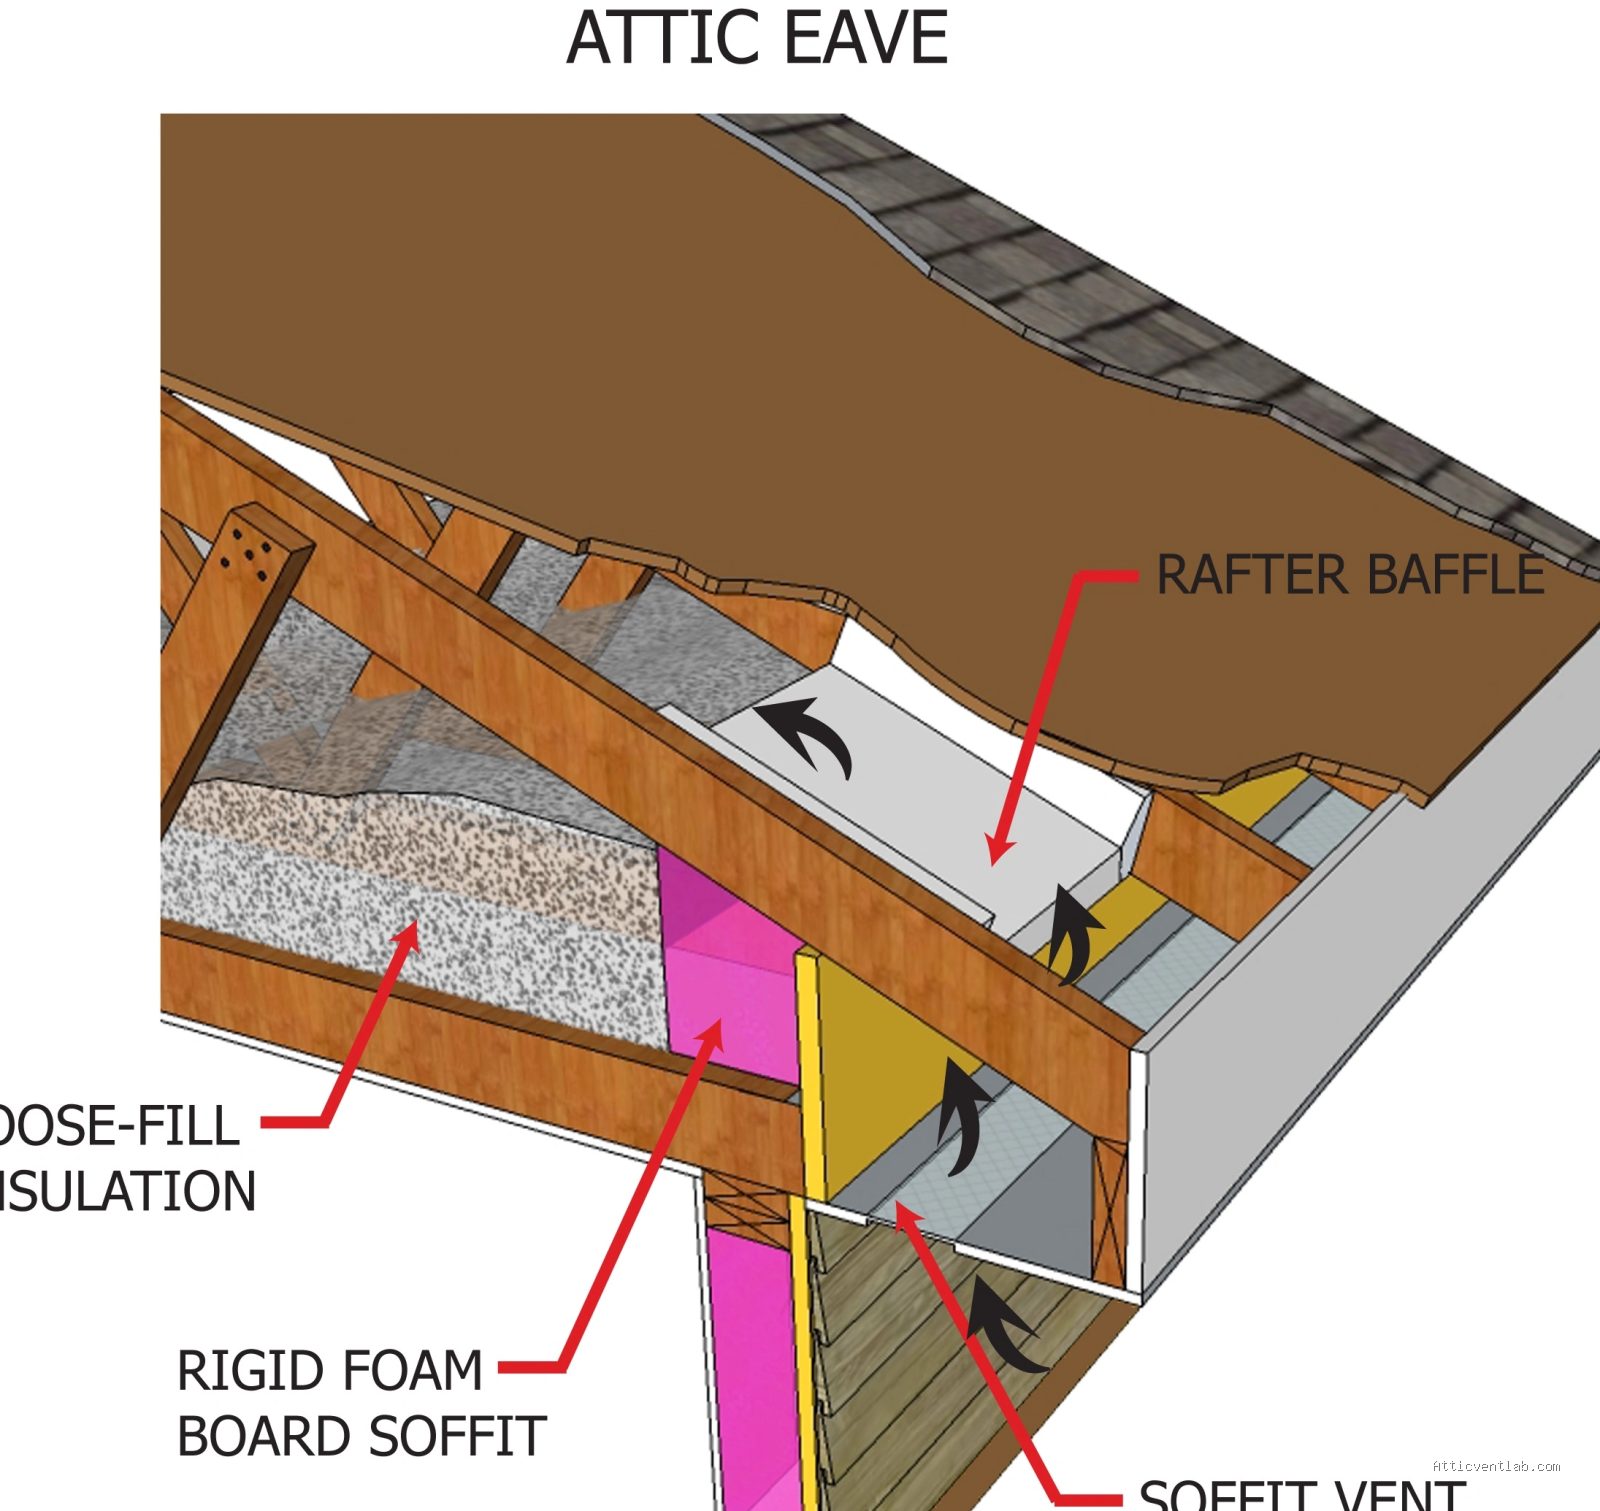
Atticventlab.com – Installing attic rafter air chutes, also known as baffle vents, is a critical prerequisite to blowing in cellulose insulation because they maintain a clear ventilation path from the soffit to the attic ridge, preventing moisture buildup and ice dams. Without these channels, loose-fill insulation will block your roof’s intake vents, leading to mold growth and compromised structural integrity of your roof decking.
Why Air Chutes are Non-Negotiable
📷 Photo by giopnhqud.blob.core.windows.net
Cellulose insulation is highly effective, but it is also heavy and prone to shifting. When blown into an attic, it tends to settle and fill every available space, including the crucial gaps at the eaves where your roof meets the exterior wall. These eaves are the primary intake points for your attic ventilation system. If these gaps are obstructed by insulation, the “breathability” of your roof is eliminated.
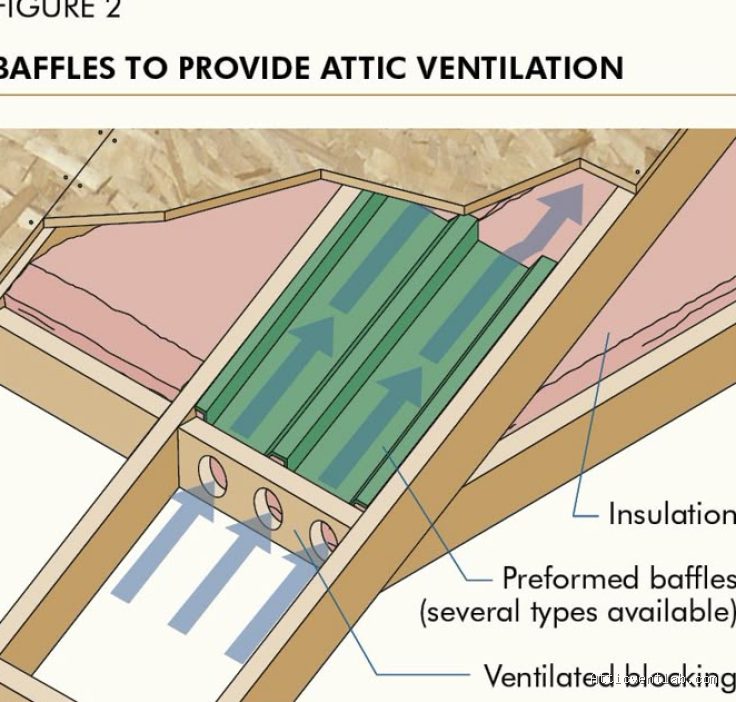
Properly installed chutes create a rigid barrier that keeps the insulation away from the underside of the roof deck while ensuring air can travel freely into the attic space. This process is often referred to as “maintaining the soffit ventilation path.” Skipping this step is one of the most common mistakes in DIY attic insulation projects, often resulting in roof rot or shingle damage within just a few years.
Tools and Materials Needed
Before you begin, gather the necessary equipment to ensure the job is safe and efficient. Working in an attic is physically demanding, so preparation is key.
| Item | Purpose |
|---|---|
| Rafter Air Chutes (Baffles) | Provide the air channel path |
| Staple Gun | Securing the baffles to rafter bays |
| Utility Knife | Trimming baffles to fit tight corners |
| Respirator Mask (N95) | Protecting lungs from dust and debris |
| Work Light | Illuminating dark, tight eave spaces |
| Knee Pads | Protecting joints on hard attic joists |
Step-by-Step Installation Guide
Installing these chutes requires working in the most confined areas of your attic. Always prioritize safety, and if possible, use boards to span across your ceiling joists to avoid stepping through the drywall below.
- Clear the perimeter of your attic by pushing back any existing old insulation from the eaves to expose the rafter bays.
- Place the air chute into the rafter bay, ensuring the bottom of the chute extends well past the top plate of the exterior wall to ensure the soffit vent is not blocked.
- Center the chute between the two rafters. Ensure the edges of the chute are tight against the wood to prevent insulation from leaking into the air channel.
- Using your staple gun, secure the chute to the sides of the rafters. Place staples every 8 to 12 inches to ensure the chute does not sag over time.
- Repeat the process for every rafter bay, ensuring that every intake vent along the perimeter of the roof is protected.
- If you encounter obstacles like plumbing stacks or wiring, trim the plastic chute with a utility knife to fit around the obstruction while maintaining the air path.
Common Mistakes to Avoid
Many homeowners assume that once the chutes are installed, the job is done. However, installation errors can render them useless. One major mistake is leaving the bottom of the chute too short. If the chute does not extend past the top plate, insulation will eventually spill over the edge and plug the soffit vent anyway.
Another frequent error is using flimsy or thin material that collapses under the weight of the blown-in insulation. Always opt for high-density plastic or treated cardboard baffles that can withstand the pressure of the insulation being blown against them. Additionally, ensure that you do not staple the chute so tightly that it warps, as this can restrict the very airflow you are trying to protect.
The Role of Air Chutes in Moisture Control
An attic is not just a storage space; it is a thermal management system. During the winter, warm air from your living space naturally rises. If that air contains moisture, it will condense on the underside of your cold roof deck. Proper ventilation, facilitated by these air chutes, carries that moisture out of the attic before it can settle.
When you blow in cellulose, you are significantly increasing the R-value of your attic floor, which makes the attic space itself colder in the winter. This temperature difference makes the ventilation path even more critical. If you do not have effective chutes, the moisture trapped in the attic will lead to damp insulation, which loses its R-value and encourages mold growth on your roof rafters.
FAQ
Q: Can I skip the air chutes if I have gable vents instead of soffit vents?
A: Yes, if your attic relies exclusively on gable vents or ridge vents without soffit intakes, air chutes are not required. However, most modern homes are designed for a continuous soffit-to-ridge flow, and you should confirm your specific ventilation setup before proceeding.
Q: Is it necessary to install chutes in every single rafter bay?
A: It is highly recommended to install them in every bay that corresponds to an intake vent. If you have intake vents along the entire perimeter of the roof, every bay requires a chute to ensure uniform ventilation and prevent localized moisture buildup.
Q: What happens if I accidentally cover the air chutes with cellulose?
A: If they are covered, the airflow will be restricted, leading to the exact problems you were trying to avoid, such as ice dams and condensation. If this happens, you must carefully rake or vacuum the excess insulation away from the baffles to restore the airflow path.
Final Considerations for a Successful Project
Before you commit to blowing in cellulose, inspect the condition of your existing roof structure. If you see signs of water staining or previous mold, address these issues before installing the chutes. Once the cellulose is installed, it is nearly impossible to access the eave areas again without making a significant mess.
By taking the time to install high-quality air chutes correctly, you are protecting your home’s envelope and ensuring that your insulation investment pays off in lower energy bills and a longer-lasting roof. This step is the foundation of a healthy attic, and when done right, it provides peace of mind for years to come.
📷 Photo by ahtest.presonus.com








Leave a Reply