

Atticventlab.com – Wind pulling step flashing loose from vinyl-sided exterior walls is primarily caused by improper fastening techniques, thermal expansion cycles that weaken nail grips, and high-velocity wind gusts that exert leverage on unsecured flashing edges.
Understanding the Mechanics of Flashing Failure
Step flashing is the unsung hero of your home’s weatherproofing system, designed to direct water away from the critical juncture where a roof meets a vertical wall. When this component pulls loose, the structural integrity of your home is compromised, inviting moisture into the wall cavity. On vinyl-sided homes, the flashing is often concealed behind the siding, making it difficult to detect until significant water damage has already occurred.
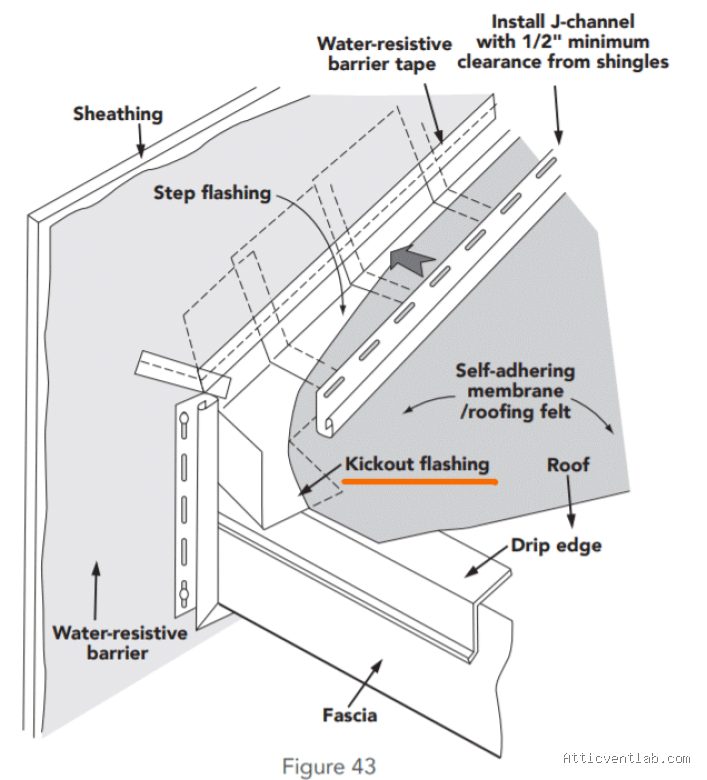
The primary culprit is often the installation process itself. If the flashing was not properly integrated with the house wrap or if the nails were driven into the vinyl siding rather than the structural sheathing, the flashing lacks the necessary tension to remain flush against the wall. Over time, the constant vibration caused by wind hitting the vinyl siding—which acts like a sail—transfers force directly to the flashing, eventually popping the fasteners loose.
The Role of Thermal Expansion and Contraction
Vinyl siding is notorious for its significant coefficient of thermal expansion. As temperatures fluctuate throughout the seasons, the siding panels expand and contract. If the flashing was installed too tightly or if the siding was nailed directly through the flashing without allowing for movement, the material will eventually work itself loose. This movement creates micro-gaps that allow wind to penetrate behind the siding, essentially creating a pressurized pocket that forces the flashing outward.
Furthermore, if the flashing material is too thin, it cannot withstand the mechanical stress of these thermal shifts. Once the flashing begins to lift even slightly, it creates a “catch point” for wind. Each subsequent gust acts as a pry bar, gradually widening the gap until the flashing is visibly hanging or completely detached.
📷 Photo by storage.googleapis.com
Common Installation Errors
Many homeowners assume their flashing is secure until a major storm exposes the underlying flaws. Below are the most common technical oversights that lead to premature failure of step flashing in vinyl-sided applications:
| Common Error | Consequence | Corrective Action |
|---|---|---|
| Nailing through the face | Restricts thermal movement | Use slotted holes or clips |
| Insufficient lap | Water ingress during storms | Minimum 4-inch overlap |
| Under-driven fasteners | Flashing vibrates in wind | Flush, secure fastening |
| Lack of house wrap integration | Moisture trapped behind wall | Ensure flashing sits under wrap |
Diagnostic Signs of Failure
Identifying the issue early can save you thousands in rot repairs. Look for “oil canning” or ripples in the vinyl siding near the roofline, which often indicates that the flashing underneath has buckled. Another telltale sign is the sound of metallic tapping during windy conditions, signaling that the flashing is no longer tightly secured to the wall sheathing.
If you notice dark streaks or damp spots appearing on the interior drywall near the chimney or roof-to-wall intersection, the flashing has likely already failed. In these cases, the wind has already succeeded in pulling the material away, and water is actively bypassing the protective barrier.
How to Properly Re-secure Loose Flashing
Repairing loose step flashing requires a systematic approach to ensure the weather barrier is restored. Follow these steps to address the issue properly:
- Carefully remove the vinyl siding panels adjacent to the affected flashing using a siding removal tool.
- Inspect the underlying wood sheathing for signs of rot or water damage; repair or replace compromised wood before proceeding.
- Clean the area of any debris or old, dried-out sealant that may prevent the new flashing from sitting flush.
- Re-attach the step flashing using galvanized roofing nails, ensuring they are driven into the structural studs or sheathing, not just the siding.
- Apply a high-quality, exterior-grade polyurethane sealant along the top edge of the flashing to prevent wind-driven rain from entering the seam.
- Reinstall the vinyl siding, ensuring you do not nail the panels too tightly, allowing them to move freely during temperature changes.
Preventive Maintenance Tips
Regular inspections are the most effective way to prevent wind-related damage. Twice a year—ideally before the spring storm season and before winter—take a visual survey of your roof-to-wall intersections. If you notice any gaps, use a specialized siding sealant to bridge the connection. Avoid the common mistake of using standard duct tape or generic adhesive; these materials break down rapidly under UV exposure and will not provide a permanent fix.
If you live in a high-wind area, consider having a professional perform a “pull test” or an inspection of the flashing fasteners. Sometimes, upgrading to a thicker gauge of aluminum or copper flashing can provide the necessary rigidity to resist wind-loading forces that thinner, stock-grade materials cannot handle.
Frequently Asked Questions
Q: Can I just caulk the loose flashing to hold it in place?
📷 Photo by abihomeservices.com
A: No, caulk is a secondary sealant, not a mechanical fastener. Using caulk alone will fail quickly because it cannot resist the physical leverage exerted by high winds on the flashing metal.
Q: Why does the flashing make a clicking sound in the wind?
A: That sound is the metal flashing vibrating against the wall sheathing or the back of the vinyl siding. It indicates that the fasteners have lost their grip and the flashing is no longer flush, which is a precursor to water leakage.
Q: Is it necessary to remove the siding to fix the flashing?
A: Yes, proper repair requires exposing the flashing to ensure it is correctly tucked under the house wrap. Attempting to fix it from the outside without removing the siding will result in a “face-nailing” error that creates new holes for water to enter.
Addressing wind-damaged flashing is not merely a cosmetic fix; it is a vital step in maintaining the building envelope. By ensuring that fasteners are secure and that the flashing is correctly integrated behind the water-resistive barrier, you protect your home from the silent threat of water intrusion.
📷 Photo by familyhandyman.com








Leave a Reply