

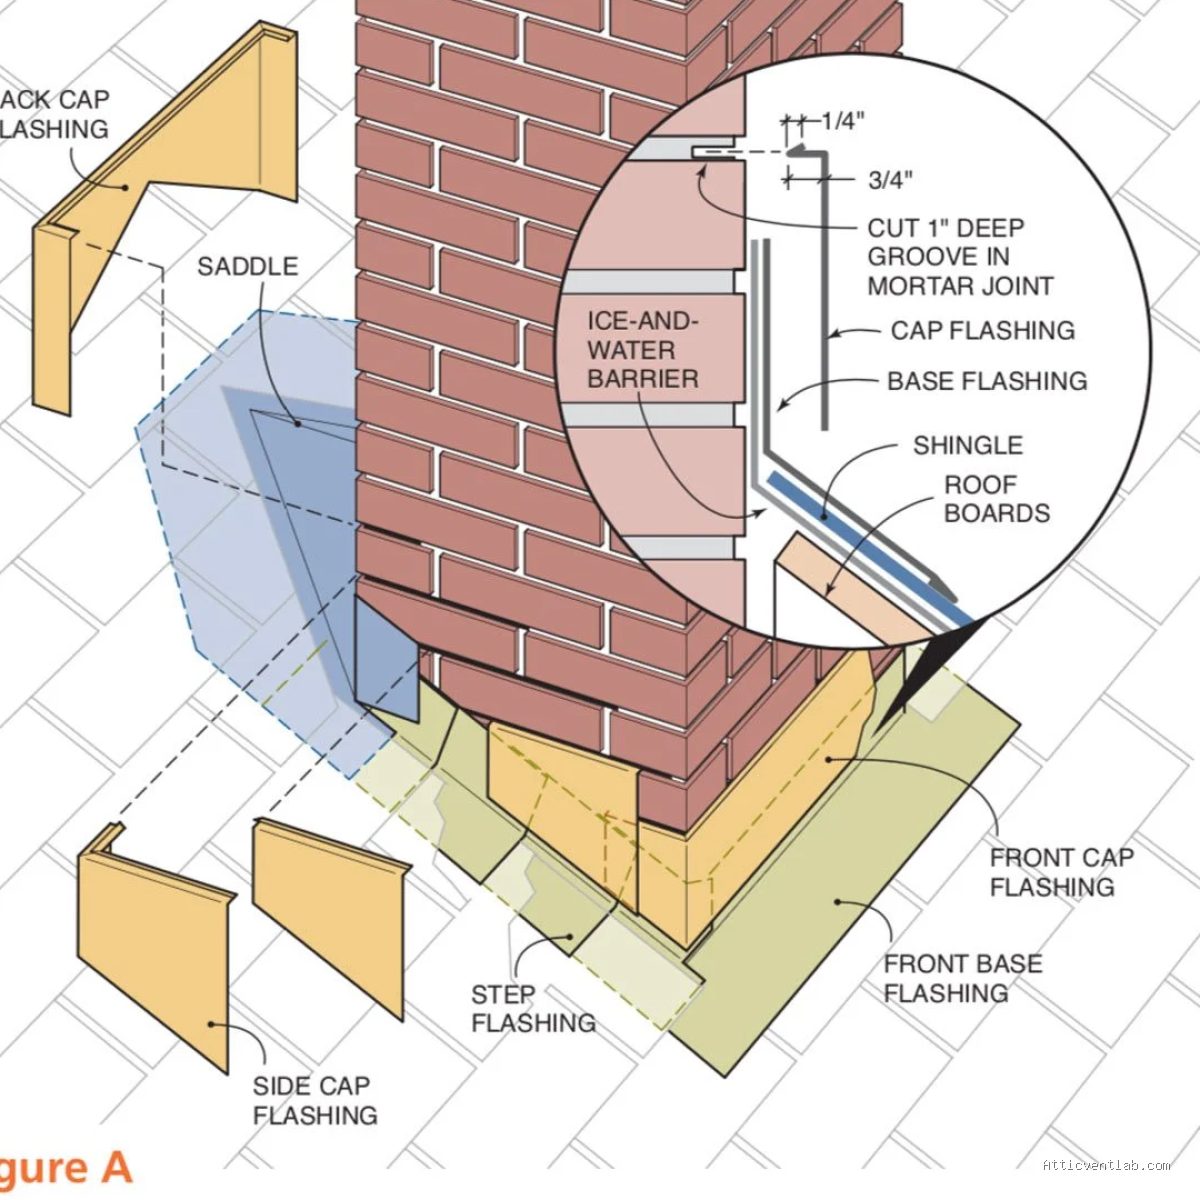
Atticventlab.com – Installing apron flashing at the front base of a brick chimney requires creating a watertight seal by embedding metal flashing into the masonry mortar joints and overlapping it onto the roof shingles to redirect water away from the vulnerable chimney-to-roof junction.
Understanding the Importance of Chimney Apron Flashing
The junction where a chimney meets a sloped roof is one of the most common entry points for water infiltration. Without proper flashing, rain and melting snow can seep behind the shingles, leading to rotted roof decking, structural mold, and interior ceiling damage. An apron flashing—specifically designed for the front (downslope) side of the chimney—acts as the first line of defense, catching water flowing down the roof and diverting it over the top of the shingles.
The success of this installation depends entirely on the seal between the metal and the brick. Because brick is porous and mortar can crack over time, simply caulking the metal to the surface is insufficient. The metal must be integrated into the chimney structure itself to prevent long-term failure.
Tools and Materials Needed
Before beginning, ensure you have the correct materials. Aluminum or galvanized steel is standard, though copper is a premium, long-lasting alternative. You will also need high-quality exterior-grade sealant, a masonry saw or angle grinder with a diamond blade, and basic roofing tools.
| Material/Tool | Purpose |
|---|---|
| Metal Flashing | Corrosion-resistant barrier (Aluminum, Copper, or Galvanized) |
| Masonry Saw | Cutting into mortar joints to create a reglet |
| Polyurethane Sealant | Flexible, weather-resistant bond for flashing joints |
| Roofing Nails | Securing the bottom flange to the roof deck |
| Angle Grinder | Smoothing edges or cleaning mortar debris |
Step-by-Step Installation Process
Follow these steps to ensure a professional-grade seal that will withstand years of harsh weather conditions. Always prioritize safety by using a secure ladder and appropriate fall protection equipment.
Read also: Why Solder Cracks on Old Copper Valley Seams and How to Torch Repair It
- Remove existing shingles around the front base of the chimney to expose the roof deck and the chimney brickwork.
- Clean the brick surface thoroughly to remove loose mortar, dust, and debris, ensuring the sealant will adhere properly.
- Measure and cut your apron flashing. It should be wide enough to extend at least 4-6 inches up the chimney and 6-8 inches down onto the roof deck.
- Using an angle grinder with a diamond blade, cut a reglet (a groove) into the mortar joint approximately 6 inches above the roof line. The groove should be about 1 inch deep.
- Insert the top edge of the flashing into the reglet. If the flashing is pre-bent, ensure the bend sits snugly against the corner where the roof meets the brick.
- Secure the flashing by driving masonry anchors or lead wedges into the reglet to hold the metal in place, then fill the groove completely with high-grade polyurethane sealant.
- Nail the bottom flange of the apron flashing to the roof deck using roofing nails. Ensure the nails are placed as high as possible so they will be covered by the next layer of shingles.
- Apply a bead of sealant over the nail heads and replace the roofing shingles, overlapping them over the bottom edge of the flashing to ensure water flows over the metal and onto the roof surface.
Common Mistakes to Avoid
One of the most frequent errors is relying solely on roofing cement or caulk to bridge the gap between the metal and the brick. Sealants expand and contract at different rates than masonry and metal; over time, this movement causes the sealant to pull away from the brick. Always cut a reglet into the mortar joint to mechanically anchor the flashing.
Another common mistake is failing to account for the “step” configuration on the sides of the chimney. While the apron handles the front, water can still track down the sides. Ensure your apron flashing is properly integrated with the step flashing running up the sides of the chimney to create a continuous, unbroken water barrier.
Signs of Flashing Failure
Regular maintenance inspections can save you thousands in repairs. Look for rusted or bent metal, which can create gaps for water to enter. If you notice interior water stains on the ceiling near the chimney, check the exterior flashing immediately. Furthermore, look for peeling or cracked sealant around the chimney base, which is often the first indicator that the flashing is no longer performing its job.
Addressing Complex Roof Profiles
If your chimney is located on a steep pitch or if you have a complex roof profile, custom-bent flashing is often required. Avoid using thin, cheap flashing materials that are prone to kinking. Investing in thicker 26-gauge steel or heavy-duty aluminum will provide the necessary rigidity to maintain its shape under the weight of snow and ice accumulation.
FAQ
Q: Can I use asphalt roofing cement instead of polyurethane sealant?
A: No, asphalt cement dries out, cracks, and loses its elasticity over time. Polyurethane sealant is specifically designed to remain flexible under extreme temperature fluctuations, making it the superior choice for chimney flashing.
Q: How far up the chimney should the flashing go?
A: A standard apron flashing should extend at least 6 inches up the vertical face of the chimney. This height provides a sufficient buffer against heavy rainfall and snow buildup that could otherwise splash over the top of the metal.
Q: Is it necessary to replace the shingles when installing new flashing?
A: While you can carefully remove and reuse existing shingles, they are often brittle after years of sun exposure. It is highly recommended to have a few new matching shingles on hand in case the old ones break during the removal process.
By following these guidelines and ensuring that the metal is mechanically anchored into the masonry, you can prevent one of the most common causes of roof leaks. Always ensure that the final installation allows for proper water drainage, with no areas where debris or water can pool against the brickwork.
📷 Photo by narodnatribuna.info








1 Comments
[…] Read also: How to Install Apron Flashing Along the Front Base of a Brick Chimney […]