

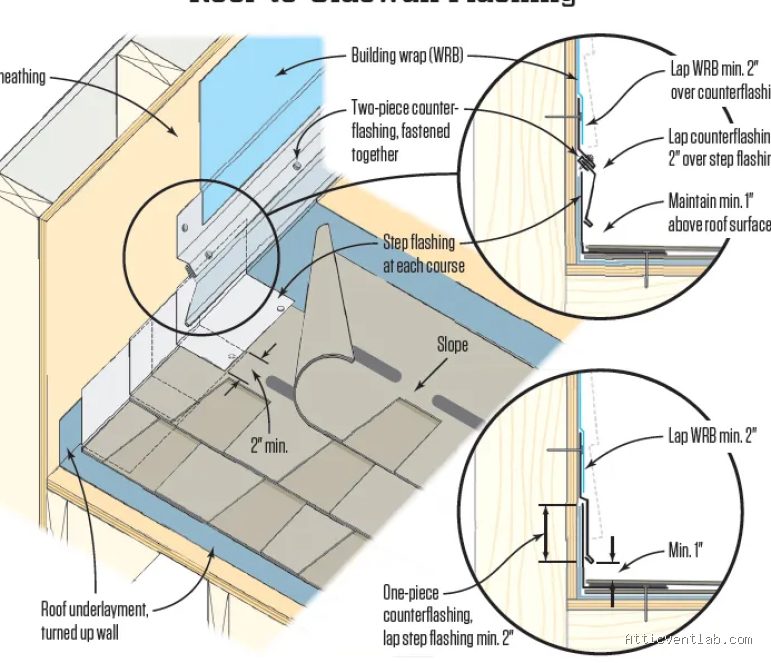
Atticventlab.com – Properly anchoring step flashing beneath fiber cement siding requires carefully tucking the metal flashing behind the siding and over the shingle step, ensuring a continuous water-shedding path that prevents moisture infiltration into the wall cavity.
Fiber cement siding, often referred to by the brand Hardie Board, is a durable and fire-resistant material, but it is highly susceptible to water damage if the flashing details are compromised. When installing step flashing, the goal is to create a shingle-style overlap that directs water away from the building envelope. Because fiber cement is brittle and heavy, the installation process requires precision to avoid cracking the material while maintaining a watertight seal.
The Importance of Proper Flashing Geometry
The primary function of step flashing is to protect the joint where a sloped roof meets a vertical wall. Each piece of flashing should be individual, measuring approximately 5 inches by 7 inches, bent at a 90-degree angle. The vertical leg of the flashing must extend at least 4 inches up the wall, and the horizontal leg should extend onto the roof deck beneath the shingles. If the flashing is not tucked properly behind the fiber cement siding, water will seep behind the siding, leading to rot in the underlying sheathing and potential structural failure.
One common mistake is relying solely on caulk to seal the gap between the roof and the siding. Caulk is a maintenance item that will eventually fail due to thermal expansion and contraction. Proper flashing creates a mechanical barrier that functions independently of sealants. Always ensure that the siding is held off the roof surface by at least 2 inches to prevent “wicking,” where the fiber cement absorbs moisture from the roof surface.
Comparative Analysis of Flashing Materials
Choosing the right material for your flashing is critical for long-term performance. While aluminum is standard, stainless steel or copper may be required in coastal environments or areas with specific building code requirements.
| Material | Durability | Corrosion Resistance | Best Use Case |
|---|---|---|---|
| Aluminum | High | Moderate | Standard residential roofing |
| Stainless Steel | Very High | Excellent | Coastal/Salt-air environments |
| Copper | Exceptional | Superior | Historic or high-end installations |
| Galvanized Steel | Moderate | Low | Temporary or budget repairs |
Step-by-Step Installation Guide
Follow these steps to anchor step flashing correctly beneath existing or new fiber cement siding.
- Prepare the wall area by removing existing siding or loosening the fasteners to create a gap of at least 2 to 3 inches between the bottom of the siding and the roof surface.
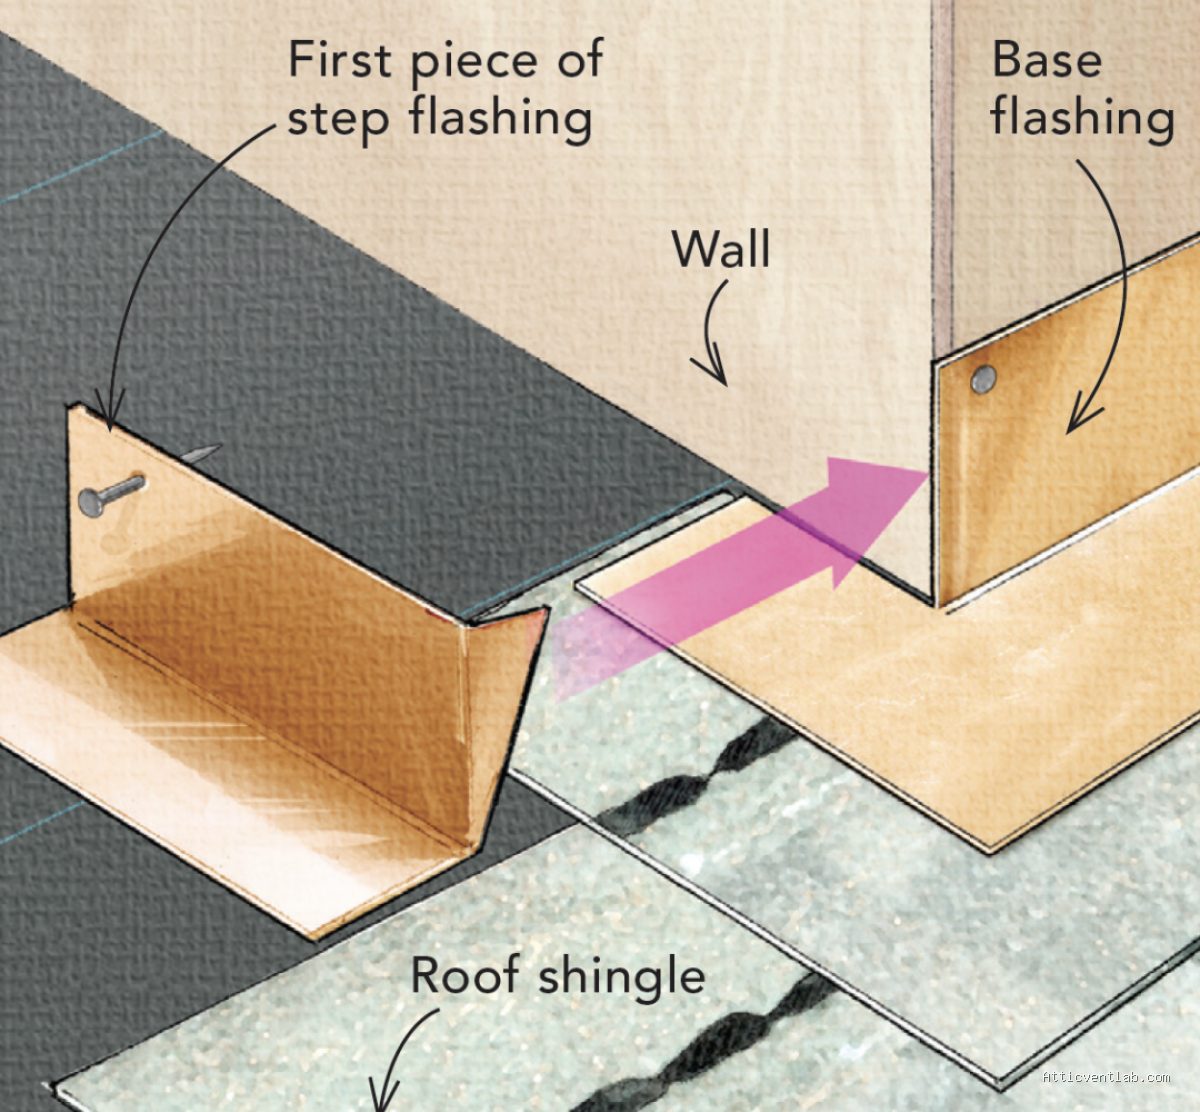
- Install the first piece of step flashing at the very bottom of the roof-to-wall transition, ensuring it sits over the starter strip and under the first course of shingles.
- Place the next piece of step flashing so that it overlaps the lower piece by at least 2 inches. This overlap ensures that any water running down the wall is directed onto the top of the lower flashing piece.
- Nail the vertical leg of the step flashing to the wall sheathing, keeping the nails as high as possible. Do not nail the flashing through the roof deck, as this creates a hole that can leak.
- Slide the fiber cement siding back into position, ensuring the bottom edge rests above the flashing. If you have removed the siding, ensure the new nails go into the studs, not through the flashing itself.
- Verify that the siding is not in direct contact with the shingles; a 2-inch clearance is the industry standard to prevent moisture absorption.
Risks of Improper Installation
When step flashing is poorly installed, the resulting water damage is often hidden for years. By the time you notice peeling paint or warped boards on the exterior, the interior wall sheathing may already be soft and infested with mold. Fiber cement is particularly dangerous in this regard; because it is so dense, it can trap moisture against the wood framing, accelerating decay without showing immediate signs of failure.
Another risk involves the nailing pattern. If you accidentally drive a siding nail through the vertical leg of the flashing, you have effectively created a puncture in your water-shedding system. Always mark the location of your flashing before re-installing siding boards to ensure your fasteners miss the metal entirely.
Maintaining the Integrity of the Installation
After the flashing is installed, inspect the vertical joints. While the flashing does the heavy lifting, a small bead of high-quality polyurethane sealant can be applied at the very top edge where the flashing meets the wall, provided it does not impede the drainage plane. Never seal the bottom of the flashing, as this will trap water and force it back into the wall.
Regular maintenance involves clearing leaves, pine needles, and debris from the roof-to-wall intersection. Debris acts as a sponge, holding water against the siding and the flashing. If you notice the fiber cement siding has been installed too low, consider trimming the bottom edge with a fiber cement saw blade, taking care to seal the cut edge with an appropriate primer or paint to prevent moisture entry.
Read also: Why Powered Attic Fans Can Backdraft Carbon Monoxide from Water Heaters
Frequently Asked Questions
Q: Can I reuse old step flashing when replacing siding?
A: It is generally not recommended. Step flashing is inexpensive, and removing it often causes it to bend or kink, which compromises its ability to create a flat, watertight seal. Always use new, straight flashing for the best results.
Q: Is it necessary to use caulk behind the step flashing?
A: No. The flashing should rely on gravity and proper overlap to keep water out. Relying on caulk creates a false sense of security and can actually trap water behind the flashing if the sealant is applied incorrectly.
Q: How do I handle corners when installing step flashing?
📷 Photo by finehomebuilding.com
A: At the corner, the flashing should be bent to wrap around the corner post or integrated with a corner piece. Ensure the flashing extends at least 4 inches beyond the corner to provide a continuous barrier for the vertical transition.
📷 Photo by jlconline.com








1 Comments
[…] Read also: How to Anchor Step Flashing Beneath Fiber Cement Hardie Board Siding […]