

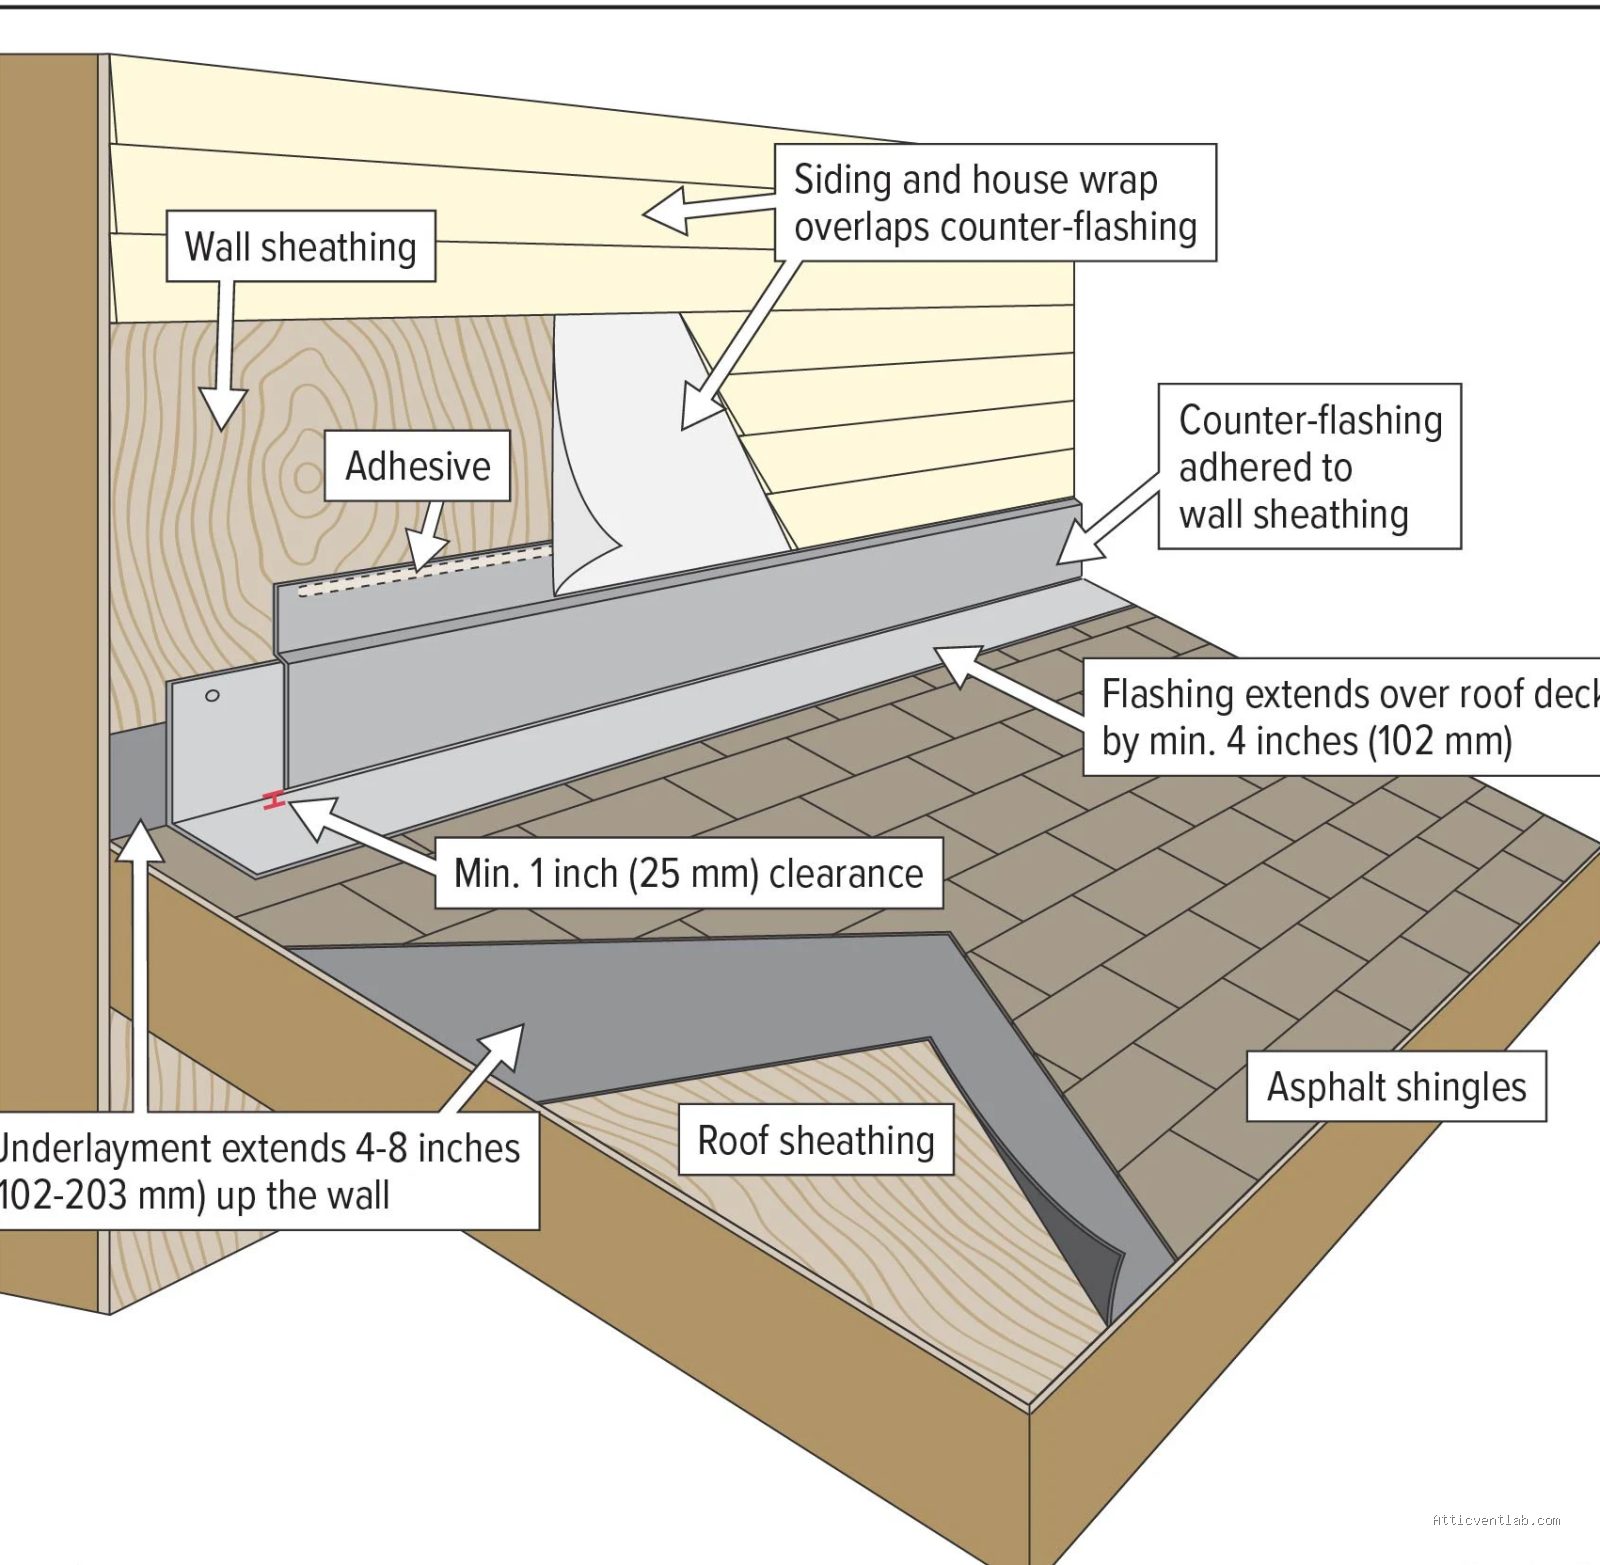
Atticventlab.com – Properly sealing headwall flashing where a lower shingle roof meets a vertical wall requires installing a continuous piece of metal flashing that extends at least two inches up the wall and underneath the siding, followed by a high-quality polyurethane sealant to create a watertight barrier.
Understanding the Vulnerability of the Headwall Joint
The junction between a roof slope and a vertical wall—commonly known as a headwall—is one of the most critical points of failure in a residential roofing system. When a lower roof terminates against a wall, water running down the siding or wind-driven rain can easily penetrate the gap between the building materials. If the flashing is improperly installed or damaged, moisture will seep behind the shingles, leading to rot in the wall studs, mold growth, and interior water damage.
The core objective of flashing is to direct water onto the surface of the shingles rather than behind them. Many homeowners mistakenly rely solely on caulk to bridge this gap. While caulk acts as a temporary secondary seal, it is not a substitute for proper metal flashing. Over time, the house will expand and contract due to temperature changes, causing rigid caulk to crack and fail, leaving your roof exposed.
Essential Materials for a Professional Seal
To achieve a long-lasting seal, you must use materials designed for exterior weather resistance. Galvanized steel, aluminum, or copper flashing are standard, with aluminum being the most common due to its flexibility and resistance to rust. You will also need a high-grade polyurethane sealant, which remains flexible over time compared to standard silicone or acrylic latex.
| Material Type | Recommended Use | Key Advantage |
|---|---|---|
| Aluminum Flashing | General roofing/siding junctions | Corrosion resistant and easy to bend |
| Polyurethane Sealant | Sealing flashing edges | Stays flexible through temperature cycles |
| Roofing Nails | Securing flashing to roof deck | Galvanized to prevent rust bleeding |
| Ice and Water Shield | Underlayment at the joint | Self-adhering moisture barrier |
Step-by-Step Installation Guide
Follow these steps to ensure your headwall flashing is installed correctly and prevents water intrusion permanently.
- Remove the existing siding or trim covering the area where the roof meets the wall to expose the structural sheathing.
- Install a strip of self-adhering ice and water shield membrane along the joint, ensuring it climbs at least four inches up the wall and extends several inches onto the roof deck.
- Measure and cut your metal flashing so that it fits the length of the wall, bending it into an “L” shape where the vertical leg is at least two to four inches tall.
- Slide the vertical leg of the flashing behind the house wrap or building paper to ensure that any water running down the siding is diverted over the flashing.
- Fasten the horizontal leg of the flashing to the roof deck using galvanized roofing nails, placing them high enough that they will be covered by the final course of shingles.
- Install the shingles over the horizontal portion of the flashing, leaving a small gap if necessary to prevent water from wicking back up under the shingles.
- Apply a thin, consistent bead of polyurethane sealant along the top edge of the flashing where it meets the wall, smoothing it out with a putty knife to ensure a tight bond.
Common Mistakes to Avoid
A frequent error is “face-nailing” the flashing through the front of the vertical leg. If you drive nails through the front of the flashing, you are essentially creating holes that water can enter. Always secure the flashing through the horizontal roof deck or tuck it securely behind the siding so that fasteners are hidden and protected.
Another mistake is using the wrong type of sealant. Cheap silicone caulks often fail to adhere well to brick, wood, or metal surfaces over the long term. Always check the label of your sealant to ensure it is rated for “exterior” use and is paintable if you intend to touch up the trim later. Never block the small gap between the shingles and the wall with excessive caulk, as this can trap water that is trying to drain off the roof.
Signs of Flashing Failure
Read also: Why Asphalt Shingles Curl Early Right Above Unventilated Attic Pockets
Regular maintenance is key to extending the life of your roof. Inspect your headwall flashing at least once a year, preferably after the winter season. Look for signs of peeling caulk, rusted metal, or shingles that have curled upward at the wall junction. If you notice interior water stains on the ceiling near the wall or a musty smell in the attic space, it is a clear indicator that the flashing seal has been compromised.
If you encounter rust on metal flashing, it is often a sign that the protective coating has worn away. In coastal areas or regions with high acid rain, aluminum or copper are superior choices to galvanized steel. If you choose to paint your flashing to match the siding, ensure you use a primer designed for metal to prevent the paint from flaking off during the next expansion cycle.
Frequently Asked Questions
Q: Can I just apply a thick layer of roofing cement over the joint instead of replacing the flashing?
A: No, roofing cement is a temporary patch and will eventually crack, crumble, or lose its bond, leading to hidden water damage inside your wall cavity.
Q: How high should the flashing go up the wall?
A: The vertical leg of your flashing should extend at least two to four inches up the wall, and it must be tucked behind the building paper or house wrap to properly shed water.
Q: Is it necessary to remove the siding to install flashing?
A: Yes, for a permanent and code-compliant repair, the siding must be pulled back or removed so the flashing can be integrated with the wall’s moisture barrier, ensuring water cannot get behind the flashing.
By following these professional installation techniques, you create a redundant system where the metal flashing handles the bulk of the water diversion, and the sealant acts as a final secondary defense. Taking the time to do this correctly saves thousands of dollars in potential structural repairs caused by long-term water infiltration.
📷 Photo by nachi.org








1 Comments
[…] Read also: How to Seal Headwall Flashing Where a Lower Shingle Roof Meets Siding […]