

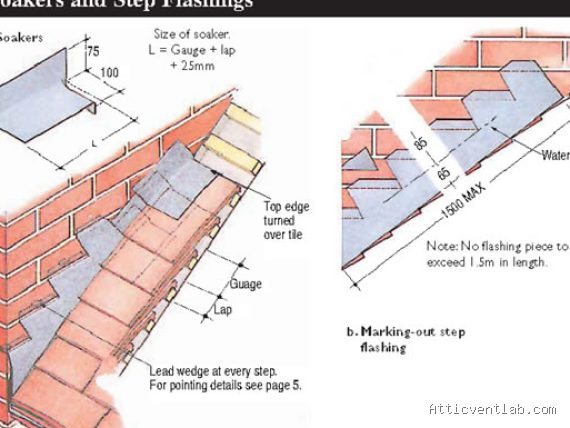
Atticventlab.com – Resealing chimney base corners requires the installation of custom lead step flashing to create a watertight overlap that directs water away from the junction and onto the roof shingles. This process involves precise bending of lead sheets to follow the roof slope and chimney masonry, ensuring that moisture cannot penetrate the vulnerable corner gaps.
Understanding the Importance of Chimney Flashing
The chimney base is the most common point of failure for residential roofing systems. Because the chimney is a rigid structure that does not expand or contract at the same rate as the surrounding roof deck, the seal between the masonry and the shingles is constantly under stress. Over time, standard caulking or thin metal strips fail, leading to water infiltration, wood rot in the roof decking, and interior ceiling stains.
Lead is widely considered the superior material for chimney flashing because of its unique physical properties. Unlike rigid steel or aluminum, lead is malleable, allowing it to be dressed down tightly against irregular masonry textures. This creates a permanent, wind-resistant seal that adapts to thermal movement without cracking or pulling away from the joint.
Tools and Materials Required
Before beginning the project, ensure you have the correct supplies. Using the wrong gauge of lead or improper fasteners will significantly shorten the lifespan of your repair. Below is a summary of the essential components needed for a professional-grade installation.
| Item | Specification/Purpose |
|---|---|
| Code 4 Lead Sheet | Standard thickness (1.8mm) for chimney flashing applications. |
| Lead Dresser | Wooden tool used to shape lead without puncturing the surface. |
| Masonry Saw | Used to cut a reglet (groove) into the brickwork for the lead. |
| Lead Mastic/Sealant | High-temperature, flexible sealant for the lead-to-brick joint. |
| Roofing Nails | Copper or stainless steel nails to prevent galvanic corrosion. |
Step-by-Step Guide to Installing Custom Lead Step Flashing
Read also: Signs of Condensation Dripping from Bare Metal Roof Undersides into the Attic
The step flashing technique involves individual pieces of lead that overlap each other, similar to the shingles themselves. This ensures that any water running down the chimney face is diverted over the top of the next piece of flashing, preventing it from ever reaching the roof deck.
- Remove the old, compromised flashing and any loose mortar from the chimney base. Ensure the surrounding shingles are pulled back slightly to expose the roof deck at the junction.
- Measure and cut your lead sheets into individual step pieces. Each piece should be bent at a 90-degree angle, with roughly 4 inches of lead going up the chimney and 6 inches resting flat on the roof deck.
- Using a masonry saw, cut a 1-inch deep reglet (a horizontal groove) into the mortar joints of the chimney. This allows the top edge of the lead to be tucked inside the chimney wall rather than relying solely on surface-applied caulk.
- Insert the top edge of each lead step into the reglet. Use lead wedges or a specialized high-temp sealant to secure the lead within the groove.
- Apply a generous bead of lead mastic along the top edge of the lead where it enters the reglet to create a secondary waterproof barrier.
- Dress the lead down firmly against the chimney and the roof surface using a wooden dresser tool. Start from the center and work toward the edges to ensure a tight, wrinkle-free fit.
- Install the next row of shingles over the bottom section of the lead flashing. The shingles should cover the lead, leaving only the upper portion visible against the chimney wall.
Common Mistakes and Best Practices
A frequent error among DIYers is “face-nailing” the flashing directly through the vertical portion of the lead. This creates a hole that water will inevitably exploit. Always rely on the reglet method or the weight of the lead itself, secured by pressure-fit wedges, to hold the flashing against the chimney. Furthermore, never use standard steel nails; the chemical reaction between steel and lead will cause the fasteners to rust and the lead to corrode rapidly.
Another critical tip is to pay attention to the “corner wrap.” When you reach the corners of the chimney, the lead must be folded or cut to create a seamless transition. For the best result, use a single, continuous piece of lead that wraps around the corner, ensuring that no vertical seam exists exactly at the corner point where water flow is most concentrated.
The Role of Maintenance
Even with high-quality lead flashing, chimneys require periodic inspection. Environmental factors such as acid rain, extreme temperature fluctuations, and structural settling can eventually compromise the sealant at the reglet. Check your chimney base every two years, particularly after a harsh winter. Look for signs of “lead creep,” where the lead may have shifted slightly, or cracks in the masonry mortar that might allow moisture to bypass the flashing entirely.
Frequently Asked Questions
Q: Can I use aluminum flashing instead of lead?
A: While aluminum is cheaper and easier to find, it is rigid and cannot be dressed to fit the irregular texture of brick as well as lead. Aluminum is prone to cracking at the bends over time, making lead the more durable, long-term choice for complex chimney corners.
Q: How do I know if my current flashing is failing?
A: Common signs of failure include water stains on the underside of the roof decking in the attic, loose or peeling caulk at the chimney junction, and visible gaps between the flashing and the brickwork. If you see rust streaks or missing shingles around the chimney base, immediate intervention is required to prevent structural damage.
By following these steps and utilizing the correct materials, you can ensure that your chimney base remains a fortified barrier against the elements for decades. Precision in bending the lead and ensuring it is properly tucked into the masonry are the two most critical factors in achieving a leak-free result.
📷 Photo by macmillanslaters.co.nz








1 Comments
[…] Read AlsoHow to Reseal Chimney Base Corners Using Custom Lead Step Flashing […]