

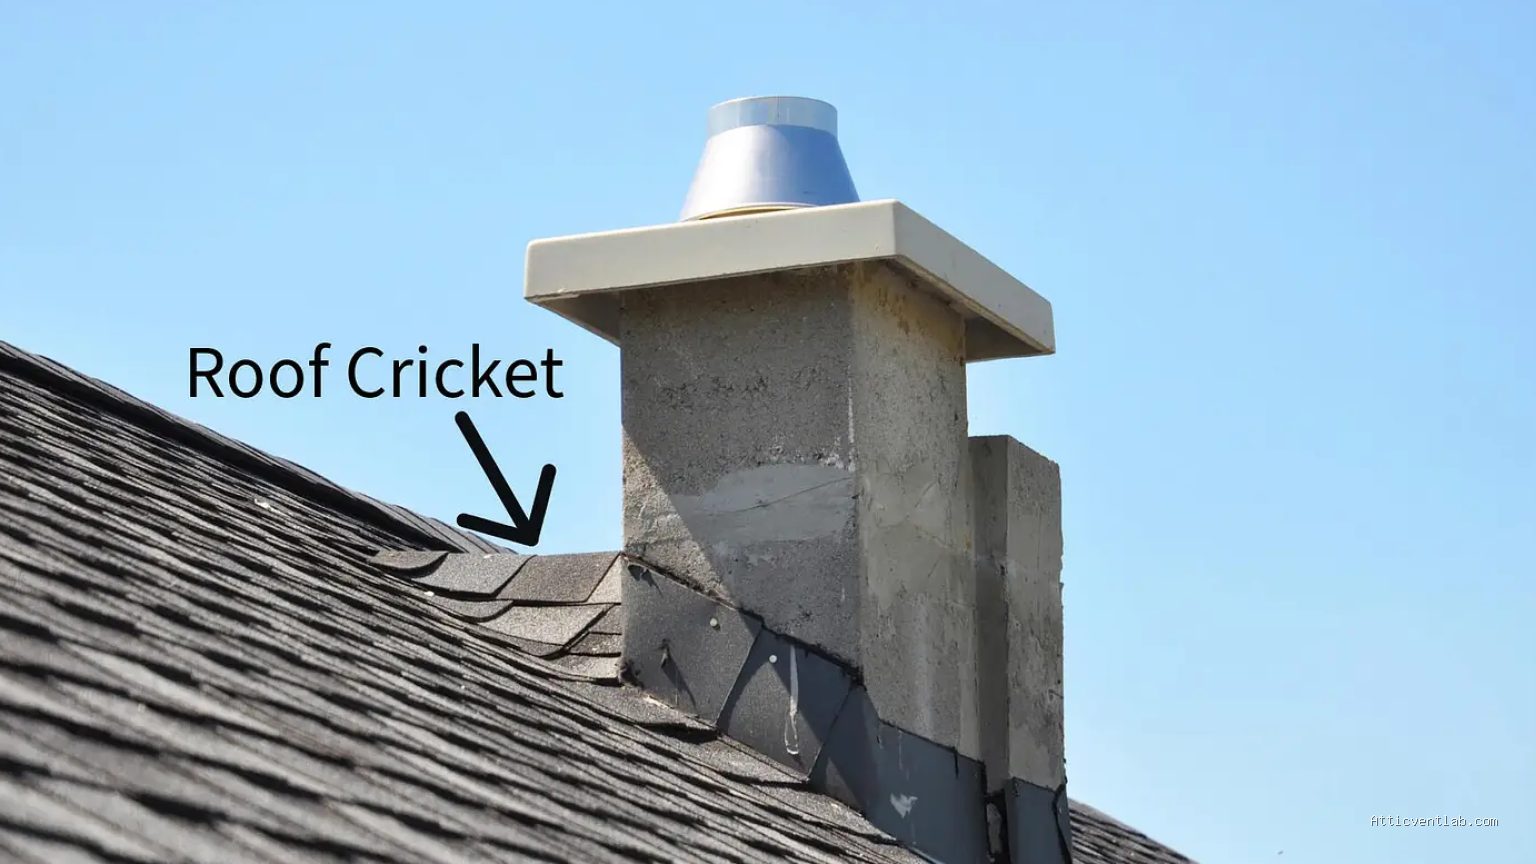
Atticventlab.com – A chimney cricket, or saddle, is a sloped, roof-like structure built on the high side of a chimney to divert rainwater and debris around the masonry, preventing leaks and structural water damage.
Installing a chimney cricket is one of the most effective ways to protect your roof’s integrity. When a chimney is wide, it acts as a dam for rain and melting snow, forcing water to pool against the flashing. Over time, this constant moisture exposure compromises the seal, leading to interior leaks and rot in the roof deck. A cricket solves this by creating a ridge that splits the water flow, directing it safely away from the chimney base and down toward the gutters.
When Do You Need a Chimney Cricket?
Not every chimney requires a cricket, but they are essential for specific roof configurations. If your chimney is wider than 30 inches across the slope of the roof, building codes in many jurisdictions mandate the installation of a cricket. Even if your chimney is smaller, you should consider a saddle if you notice frequent debris buildup behind the masonry or if you have experienced recurring leaks despite replacing the flashing.
The primary goal is to ensure the roof surface behind the chimney is no longer a flat “catchment area.” By elevating the center point of the area behind the chimney, you force the water to take the path of least resistance—around the sides—rather than stagnating against the mortar and flashing.
Materials and Tools Checklist
Before starting, ensure you have the correct materials. Using high-quality underlayment and durable flashing is non-negotiable for a long-lasting repair.
| Material/Tool | Purpose |
|---|---|
| Pressure-treated 2×4 or 2×6 lumber | Framing the cricket structure |
| Exterior-grade plywood | Sheathing the cricket surface |
| Self-adhering waterproofing membrane | Primary leak barrier |
| Aluminum or copper flashing | Water diversion and weatherproofing |
| Roofing nails and construction adhesive | Securing the frame and sheathing |
Step-by-Step Installation Guide
Building a cricket is a framing task that requires precision. If you are uncomfortable working on a sloped roof or lack experience with structural framing, consult a professional roofing contractor to avoid safety hazards.
- Clear the area by removing shingles and underlayment around the back of the chimney to expose the roof deck. Ensure the wood is dry and free of rot.
- Measure the width of the chimney and the required pitch. Cut your ridge board and rafters to create a triangular structure that matches the slope of your roof.
- Install the ridge board so that it runs from the center of the chimney back to the roof deck, creating a peak that slopes down toward the sides of the chimney.
- Secure the frame to the roof deck using structural screws or galvanized nails, ensuring it is perfectly plumb and square.
- Cover the frame with exterior-grade plywood, cutting the sheets to fit the slopes of the cricket perfectly.
- Apply a high-temperature self-adhering waterproofing membrane over the entire cricket surface, overlapping onto the existing roof deck by at least 6 inches.
- Install step flashing along the sides of the chimney and counter-flashing over the top of the cricket to ensure a watertight seal against the masonry.
- Re-shingle the cricket surface, blending the new shingles with the existing roof to maintain a consistent aesthetic and drainage pattern.
Common Mistakes to Avoid
The most common error in cricket installation is failing to integrate the flashing correctly with the existing roof shingles. If the shingles are not woven or layered properly, water will find a way behind the new structure. Another frequent mistake is using non-pressure-treated wood. Because the cricket is a high-moisture area, standard lumber will rot quickly, necessitating expensive repairs only a few years down the line.
Additionally, do not neglect the counter-flashing. Many DIYers rely solely on roofing cement to seal the joint between the chimney and the cricket roof. Roofing cement eventually cracks due to thermal expansion and contraction; metal counter-flashing embedded into the mortar joints provides a permanent mechanical seal that cement cannot match.
Risks of Ignoring Chimney Drainage
Ignoring water runoff issues around your chimney can lead to severe structural damage. Water that pools behind the chimney will eventually find its way into the attic space, causing insulation to lose its R-value and promoting mold growth. In colder climates, the freeze-thaw cycle can cause bricks to spall and mortar to crumble, potentially leading to a structural failure of the chimney stack itself.
Read also: Why Caulk Fails Quickly When Smeared Over Wet Step Flashing Seams
Frequently Asked Questions
Q: Can I build a chimney cricket out of just roofing cement?
A: No. Roofing cement is a temporary sealant, not a structural material. A cricket must be framed with wood and sheathed to redirect water volume; cement will simply act as a dam and trap more water, worsening the leak.
Q: Is it necessary to hire a professional for this project?
A: While a skilled DIYer can handle this, it involves working at heights and cutting complex angles. If you are not confident in your framing skills or roof safety protocols, hiring a professional is recommended to ensure the flashing is installed to code.
Q: How long does a properly installed cricket last?
A: A well-constructed cricket using pressure-treated lumber, quality underlayment, and metal flashing should last as long as the rest of your roof, typically 20 to 30 years depending on the roofing material used.
Ultimately, a chimney cricket is an investment in the longevity of your home. By managing water flow effectively, you eliminate the primary cause of chimney-related leaks, saving yourself from the stress of internal water damage and the high costs of structural masonry repairs.
📷 Photo by instantroofer.com








1 Comments
[…] Read also: How to Install a Chimney Cricket Saddle to Divert Water Off the Back Wall […]