

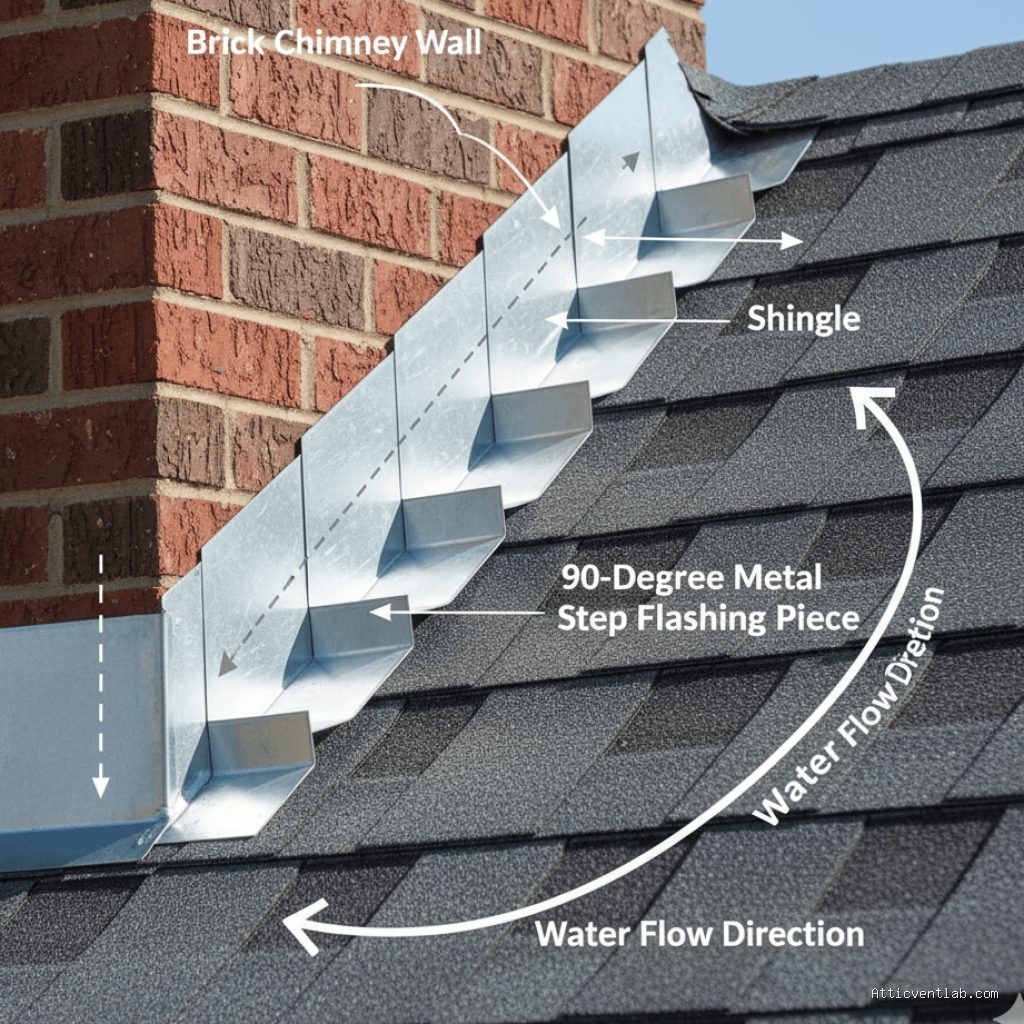
Atticventlab.com – Caulk fails prematurely when applied over wet step flashing seams because moisture prevents the sealant from establishing a chemical bond with the substrate, leading to adhesion loss and water infiltration. Trapped water creates a barrier that forces the caulk to cure as a loose layer rather than an integrated, flexible seal.
The Mechanics of Sealant Failure
When you apply caulk to a roof flashing seam, you are relying on molecular adhesion to keep the elements out. High-quality exterior sealants, such as polyurethane or silicone, require a clean, dry surface to penetrate the microscopic pores of the metal and the adjacent roofing material. If the flashing is wet, the water molecules occupy those pores, physically blocking the sealant from making contact.
Furthermore, as the trapped moisture attempts to evaporate, it creates vapor pressure. This pressure pushes against the underside of the newly applied caulk bead. Since the sealant has not yet cross-linked or cured, this outward force causes bubbling, pinholes, or complete delamination from the flashing surface. The result is a gap that looks sealed from the outside but acts as a funnel for water to travel directly into your roof deck.
Why Wet Surfaces Are the Enemy
Most professional-grade sealants are designed to be hydrophobic once cured, but they are not necessarily moisture-tolerant during the application phase. Applying caulk over a wet seam is one of the most common reasons for callbacks in the roofing industry. Many homeowners or inexperienced contractors assume that because a product is labeled “all-weather,” it can be applied during a downpour. This is a dangerous misconception.
Even if the surface appears dry to the touch, ambient humidity or dew can leave a thin film of water on metal flashing. Because metal is non-porous, it does not absorb this moisture, making it exceptionally prone to adhesion failure. When the sun hits the flashing, the metal expands and contracts, and if the caulk is not perfectly bonded due to that initial moisture, the seal will tear away almost immediately.
Comparison of Failure Risks
| Condition | Adhesion Risk | Long-term Performance |
|---|---|---|
| Bone Dry | Low (Optimal) | Excellent bond and flexibility |
| Surface Dew | Moderate | Risk of pinholes and bubbling |
| Active Rain/Standing Water | High (Critical Failure) | Immediate delamination |
Consequences of Improper Application
Read also: How to Lower Summer Attic Temperatures Without Running High-Wattage Fans
The failure of caulk at step flashing seams creates a deceptive situation. Water enters the gap, runs down the back of the flashing, and often saturates the wood sheathing or the wall studs before a leak ever appears on your ceiling. By the time you notice a water stain inside your home, the structural wood may already be suffering from dry rot or mold growth.
This is why simply “re-caulking” over a failed bead is rarely a permanent fix. If the original layer failed because of moisture, applying more material over the top only traps more debris and water, creating a sandwich of failed sealant that will continue to degrade the integrity of the flashing system.
Steps for a Proper Flashing Seal
To ensure a long-lasting seal, you must prioritize surface preparation over the speed of application. Follow these steps to prevent premature failure:
- Clear the area of all old, cracked, or loose sealant using a scraper or a stiff wire brush to expose the raw flashing surface.
- Clean the metal and adjacent shingles with a solvent-safe rag and a small amount of denatured alcohol to remove oils and mineral deposits.
- Allow the surface to air dry completely for at least two hours; use a heat gun or hair dryer on a low setting if the humidity is high to ensure no moisture remains in the seam.
- Check the weather forecast to ensure at least 24 hours of dry conditions, as most sealants require a full cure cycle to resist heavy rain.
- Apply the sealant in a smooth, continuous bead, ensuring it bridges the gap between the metal flashing and the shingle without leaving air pockets.
- Tool the caulk with a gloved finger or a specialized smoothing tool to press the material firmly into the seam, ensuring maximum contact with the substrate.
Common Mistakes to Avoid
📷 Photo by dreamden.ai
One frequent error is over-tooling the caulk. When you manipulate the bead too much, you can actually thin out the edges of the sealant, creating weak points where the caulk meets the surface. Another mistake is using the wrong type of sealant. Cheap acrylic caulks become brittle when exposed to the extreme temperature fluctuations found on a roof, leading to cracking even if the initial application was done on a dry day.
Always check the manufacturer’s technical data sheet for the sealant you choose. If it does not explicitly state that it is rated for “damp surfaces,” do not risk it. Even for products that claim moisture tolerance, a bone-dry surface remains the gold standard for long-term reliability.
FAQ
Q: Can I use a hair dryer to dry the flashing before caulking?
A: Yes, using a heat gun or hair dryer is an excellent way to remove surface moisture and dew before application, but ensure the metal is not scorching hot, as this can cause the sealant to skin over too quickly.
📷 Photo by narodnatribuna.info
Q: What is the best type of sealant for step flashing?
A: Polyurethane-based sealants are generally preferred for roofing applications because they offer superior elasticity and adhesion to metal compared to standard silicone, which can struggle to bond to certain roofing materials.
Q: How do I know if my caulk has failed?
A: Look for visible gaps between the sealant and the metal, peeling edges, or “fish-eyes” (small circular craters) in the bead, all of which indicate that moisture was present during the curing process.
📷 Photo by roofing-cop.com








1 Comments
[…] Read also: Why Caulk Fails Quickly When Smeared Over Wet Step Flashing Seams […]