

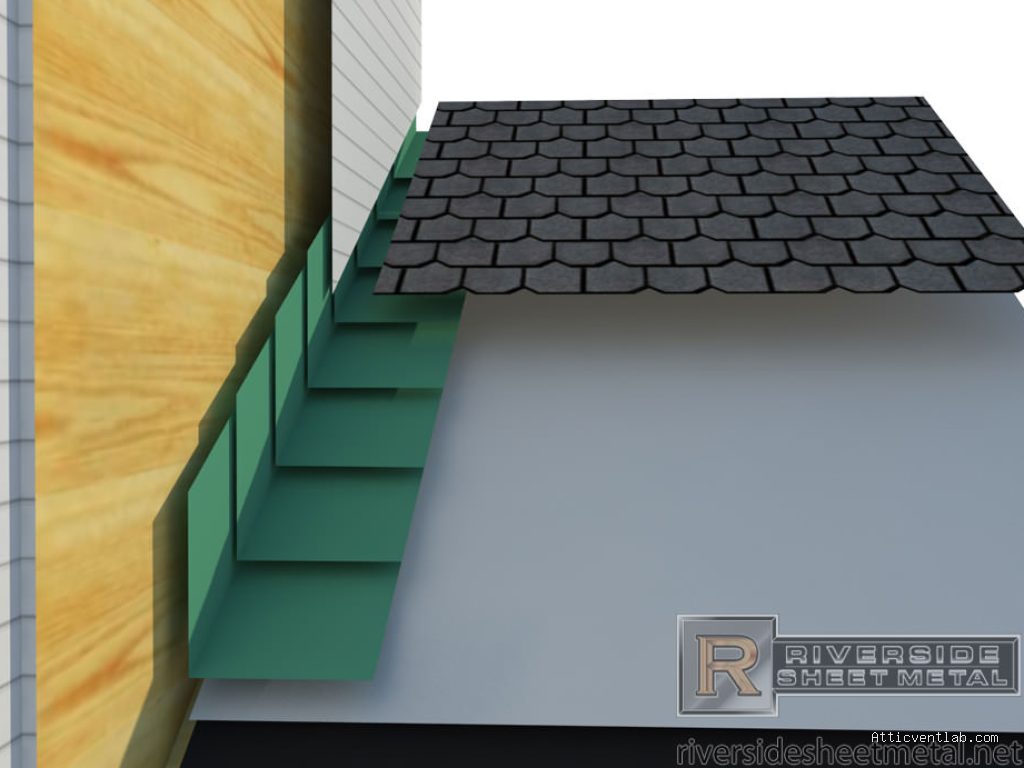
Atticventlab.com – Installing step flashing at a sloped roof-to-wall transition requires weaving individual metal pieces behind the siding and over the shingles to create a watertight seal that prevents water infiltration. Proper installation ensures that runoff is diverted away from the joint and onto the surface of the roof, protecting the structural integrity of your home.
The Importance of Proper Flashing Technique
The roof-to-wall intersection is one of the most common areas for water leaks. When a sloped roof meets a vertical wall, water naturally flows down the incline and gathers at the junction. If the flashing is not installed correctly, moisture can seep behind the siding, rot the wall studs, and compromise the interior wallboard. Step flashing is the gold standard for this specific area because it provides a layered, shingle-like defense that allows for movement and expansion without breaking the seal.
Tools and Materials You Will Need
Before beginning the installation, ensure you have the correct materials. Using the wrong gauge of metal or improper fasteners will lead to premature failure. The following table outlines the essential items required for a professional-grade installation.
| Item | Specification/Purpose |
|---|---|
| Step Flashing Pieces | Typically 5×7 inch or 6×8 inch L-shaped aluminum or galvanized steel. |
| Roofing Nails | 1-1/4 inch galvanized steel nails with large heads. |
| Roofing Cement | High-grade asphalt-based plastic cement for sealing gaps. |
| Tin Snips | Aviation snips for cutting and shaping metal pieces. |
| Caulking Gun | For applying sealant behind the siding or at the top edges. |
Step-by-Step Installation Guide
Following a systematic approach is critical. You must start at the lowest point of the slope and work your way up to ensure that each subsequent piece of flashing overlaps the one below it, much like standard roof shingles.
- Remove the existing siding along the wall-to-roof junction. You need to expose the underlying wall sheathing by at least 4 to 6 inches to ensure the flashing can be tucked properly behind the building wrap.
- Install the starter piece. Place the first piece of step flashing at the bottom corner where the roof meets the wall. The metal should extend at least 2 inches onto the roof and 3 inches up the wall.
- Secure the flashing. Drive a single nail through the top corner of the flashing into the wall stud. Do not nail the flashing into the roof deck, as this can cause leaks and restrict the movement of the materials.
- Install the first shingle. Place a roof shingle over the bottom flange of the step flashing. Ensure the shingle covers the metal completely so that no metal is visible at the very bottom edge.
- Layer the process. Place the next piece of step flashing over the top of the first shingle, ensuring it overlaps the previous piece of flashing by at least 2 inches. Continue this pattern: flashing, then shingle, then flashing, then shingle.
- Seal the top edge. Once you reach the top of the roof slope, apply a generous bead of high-quality roofing cement or exterior-grade sealant to the top edge of the final flashing piece to prevent wind-driven rain from entering.
- Replace the siding. Reinstall the siding, ensuring that it overlaps the vertical portion of the flashing by at least 1 or 2 inches. Never nail the siding through the flashing, as this creates a direct path for water to enter.
Common Mistakes and Prevention
One of the most frequent errors homeowners make is “face-nailing” the flashing into the roof shingles. This creates a puncture point that eventually rusts or expands, leading to a leak. Always secure the metal to the vertical wall surface only. Another common mistake is failing to overlap the pieces sufficiently. If the overlap is less than 2 inches, high winds can push water underneath the metal, rendering the entire system useless.
Signs of Flashing Failure
Regular inspection is the best way to avoid costly repairs. Keep an eye out for interior water stains on the ceiling near exterior walls. Externally, look for rusted or bent metal pieces, gaps between the siding and the roof, or shingles that appear lifted or curled at the edge of the wall. If you notice any of these signs, address them immediately before the underlying wood sheathing begins to decay.
Weather Considerations
Always perform this work during dry, temperate weather. Roofing cement does not adhere well in freezing temperatures, and working on a slippery, wet roof is a significant safety hazard. If you are working on a steep roof, always utilize proper fall protection equipment, including harnesses and roof jacks, to ensure your safety throughout the process.
Frequently Asked Questions
Q: Can I reuse old flashing pieces if they look clean?
A: It is highly recommended to install new flashing. Old flashing often develops micro-fractures during removal, and the metal can become brittle, leading to leaks shortly after re-installation.
Q: Should I use caulk instead of metal step flashing?
A: Never rely on caulk as a primary waterproofing method for a roof-to-wall transition. Caulk is a secondary seal; metal flashing is the structural component that directs water away from the joint.
Q: How far up the wall should the flashing go?
A: The vertical leg of the step flashing should extend at least 3 to 4 inches up the wall, and it should be covered by at least 2 inches of siding to ensure a complete weather barrier.
By following these guidelines, you create a durable, redundant system that manages water runoff effectively. While the process requires precision, the longevity of your roof depends entirely on the quality of these critical transitions.
📷 Photo by narodnatribuna.info








Leave a Reply