

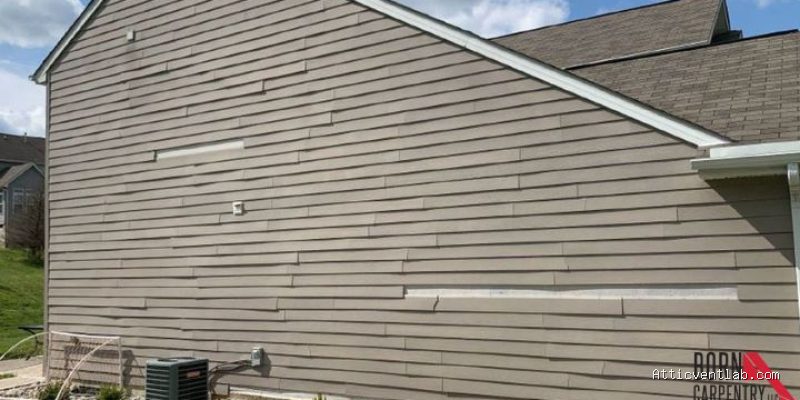
Atticventlab.com – Warped siding boards caused by buried step flashing nails occur when nails are driven too deep or improperly positioned, preventing the siding from sitting flush against the wall, which leads to localized buckling as the materials expand and contract. This hidden structural conflict forces the siding to bow outward, creating gaps that invite moisture infiltration and long-term rot.
Homeowners often mistake warped siding for simple aging or poor installation, but the root cause is frequently buried deep behind the exterior finish. Step flashing is a critical component of roof-to-wall transitions, designed to divert water away from the junction. When a contractor or installer drives a nail through the siding and inadvertently pins the step flashing incorrectly, or when the flashing itself is forced out of alignment by a misplaced nail, the siding loses its ability to move naturally with thermal changes. This creates a pressure point that inevitably results in a visible warp or wave in the cladding.
The Mechanism of Failure
Siding materials, whether they are vinyl, fiber cement, or engineered wood, are designed to move. Manufacturers explicitly state that siding should be hung, not rigidly fixed, to accommodate seasonal temperature fluctuations. When a step flashing nail is buried or driven through the siding board itself—rather than being hidden underneath the overlap—it acts as a mechanical anchor. As the ambient temperature rises, the siding board expands. Because it is pinned by the nail, it has nowhere to go but outward, resulting in a visible buckle or warp.
Furthermore, buried nails often fail to account for the thickness of the step flashing. If the flashing is not properly integrated behind the siding, it creates a “hump” that the siding must stretch over. This tension is magnified by the fastener, which holds the siding in a state of permanent stress. Over time, the material fatigues, the warp becomes permanent, and the gap between the siding and the wall grows, allowing wind-driven rain to bypass the flashing entirely.
Identifying the Signs of Hidden Damage
Detecting this issue requires a keen eye, as the nail itself is rarely visible. Look for localized distortion starting precisely where the roof meets the wall. If you notice a single board bowing while the rest of the wall remains flat, or if there is a recurring “wave” that aligns with the slope of the roof, the culprit is likely a buried fastener interfering with the flashing.
Another telltale sign is the sound of friction. During extreme temperature changes in the morning or evening, you might hear a faint popping or cracking noise coming from the wall junction. This is the siding straining against the hidden nail head. Additionally, if the area around the warp shows signs of dark staining or moss growth, it indicates that the buckling has already compromised the water-shedding capability of the flashing system, allowing moisture to pool behind the siding.
Comparison of Siding Problems
| Issue Type | Visual Characteristic | Primary Cause |
|---|---|---|
| Buried Nail Warp | Localized bowing at roof junction | Fastener pinning siding to flashing |
| Thermal Buckling | Widespread wavy appearance | Lack of expansion gaps |
| Moisture Rot | Soft, discolored, or crumbling material | Water trapped behind cladding |
| Poor Installation | Sagging or loose panels | Nails driven too tight/no movement |
Steps to Diagnose and Address the Issue
If you suspect that your siding is being warped by hidden fasteners, you must act carefully to avoid causing further damage to the building envelope. Follow these steps to investigate and resolve the issue:
- Locate the center of the warp by gently pressing on the siding. If it feels rigid rather than springy, a nail is likely holding it in place.
- Use a thin, flat pry bar or a stiff putty knife to gently lift the edge of the siding board above the warped section to inspect the flashing-to-siding interface.
- Look for a nail head that has been driven through the siding into the flashing or the wall stud, preventing the board from sliding.
- If a nail is identified as the source of the tension, carefully extract it using a siding removal tool or a thin cat’s paw, ensuring you do not puncture the step flashing in the process.
- Once the offending nail is removed, ensure the siding can move freely. If the flashing is damaged, seal the hole with a high-quality exterior-grade sealant or replace the damaged piece of flashing before re-securing the siding.
- Re-attach the siding using appropriate fasteners, ensuring they are driven into the nailing slots rather than through the face of the material, allowing for natural expansion.
Common Mistakes to Avoid
One of the most frequent errors during repair is simply hammering the warped siding back into place. This is a temporary fix that will likely result in the siding buckling again within months. Another mistake is applying excessive amounts of caulk to the warped area to “hide” the gap. Caulk should never be used to bridge a gap caused by mechanical stress; it will eventually crack, and more importantly, it can trap water behind the siding that should have been allowed to drain out.
Also, avoid using standard framing nails for siding repairs. Siding requires specific fasteners that are corrosion-resistant and have a head design that allows for slight movement. Using a nail with a head that is too small or too large can restrict the siding’s movement or cause the material to crack during installation.
The Long-Term Risk
Ignoring these warped boards is a gamble with your home’s structural integrity. When siding is forced away from the wall, the step flashing is no longer doing its job. Instead of shedding water onto the roof surface, the flashing may end up funneling water behind the siding and into the wall cavity. This creates an environment for mold, wood rot in the wall studs, and damage to the underlying sheathing. Over time, what started as a simple aesthetic nuisance becomes a costly repair involving water damage remediation and exterior wall reconstruction.
Q: Can I just caulk the gap where the siding is warped?
A: No. Caulking the gap will not solve the underlying mechanical pressure caused by the nail. It will also trap moisture behind the siding, which can lead to rapid rot of the wall sheathing.
Q: Is it safe to leave the siding warped if there are no leaks?
A: It is not recommended. Even if there are no visible leaks inside the house, the warp indicates that the flashing is compromised. Moisture is likely accumulating behind the siding, which will eventually lead to structural damage.
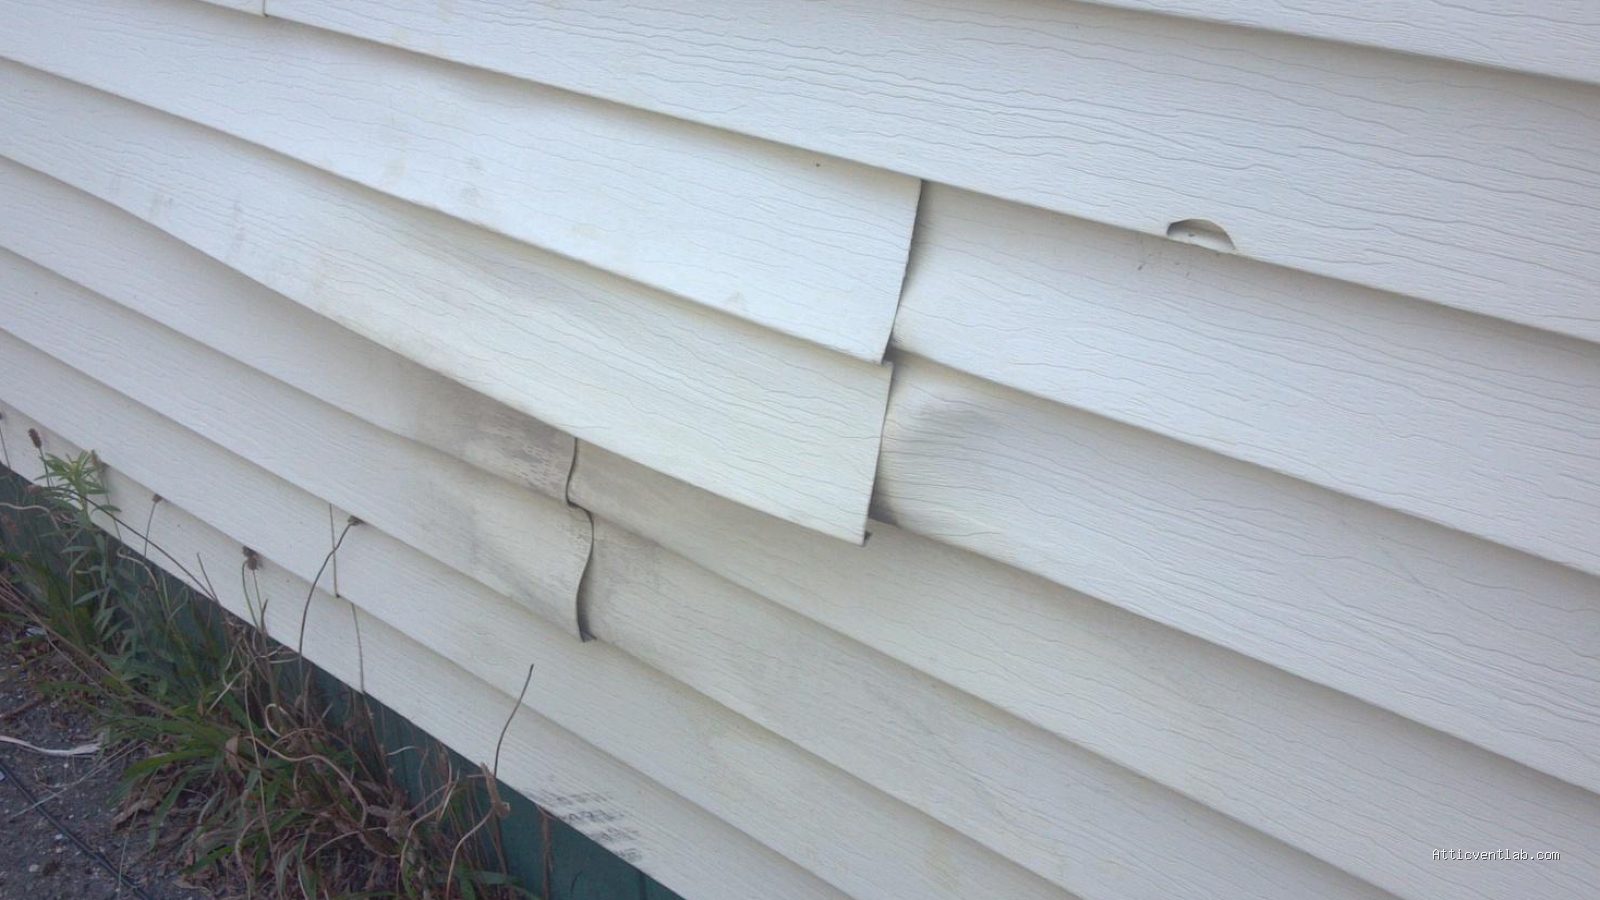
📷 Photo by storables.com
Q: How do I know if the flashing itself is damaged?
A: If you notice rust streaks, visible holes, or if the flashing feels loose when you inspect it, the material has likely been compromised by the improper nailing process and should be replaced.
Maintaining the integrity of your exterior cladding is essential for the longevity of your home. By understanding how fasteners and flashing interact, you can identify potential problems before they escalate into major water damage issues. Always prioritize the ability of your siding to expand and contract, and ensure that every fastener serves its purpose without restricting the natural movement of the building materials.
📷 Photo by borncarpentry.com






Leave a Reply